Spring 5 came with official support for Kotlin, a JVM language developed by Jetbrains which focuses on code clarity and conciseness. Many web applications today are a mockup of content from other websites, which are usually exposed with a web service. Consuming a web service is really easy when you use Spring’s RestTemplate class. This tutorial is an adaptation of the one found here, which has been modified to use the Kotlin language.
Project Structure
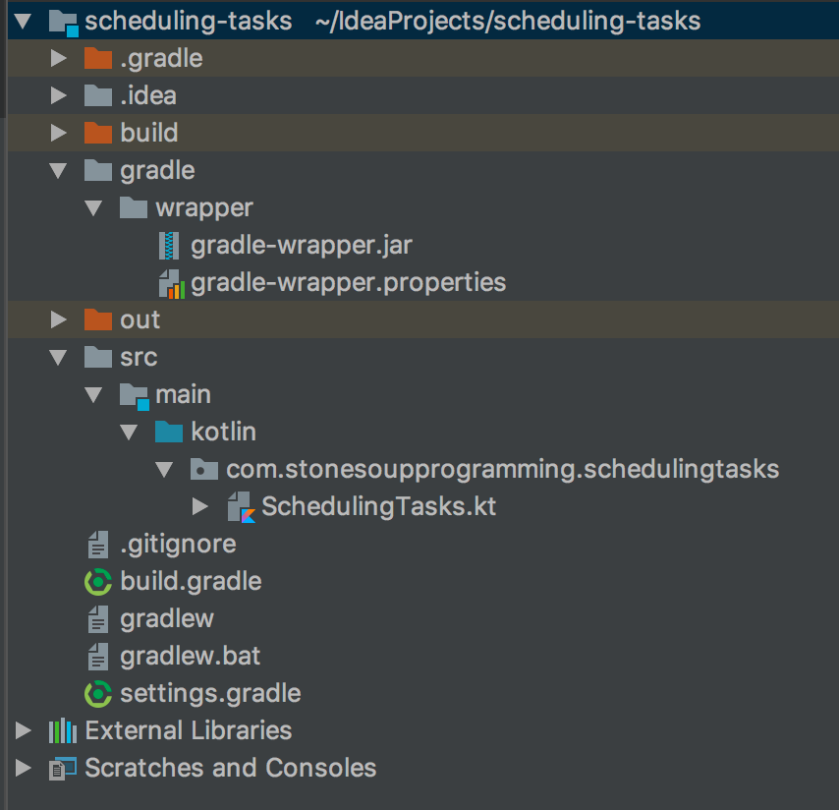
You will want to setup your project with a folder structure that is similar to the one shown in the screenshot below.

build.gradle
Next you will want to use a dependency management system, either gradle or maven, which will see to the details of downloading your dependencies. We use gradle in this tutorial.
buildscript {
    ext.kotlin_version = '1.2.30'

    repositories {
        mavenCentral()
    }
    dependencies {
        classpath "org.jetbrains.kotlin:kotlin-gradle-plugin:$kotlin_version"
        classpath("org.springframework.boot:spring-boot-gradle-plugin:2.0.1.RELEASE")
    }
}

group 'com.stonesoupprogramming'
version '1.0-SNAPSHOT'

apply plugin: 'kotlin'
apply plugin: 'org.springframework.boot'
apply plugin: 'io.spring.dependency-management'

bootJar {
    baseName = 'gs-consuming-rest'
    version =  '0.1.0'
}

repositories {
    mavenCentral()
}

dependencies {
    compile "org.jetbrains.kotlin:kotlin-stdlib-jdk8:$kotlin_version"
    compile group: 'org.jetbrains.kotlin', name: 'kotlin-reflect', version: '$kotlin_version'
    compile("org.springframework.boot:spring-boot-starter")
    compile("org.springframework:spring-web")
    compile("com.fasterxml.jackson.core:jackson-databind")
}

compileKotlin {
    kotlinOptions.jvmTarget = "1.8"
}
compileTestKotlin {
    kotlinOptions.jvmTarget = "1.8"
}
ConsumingRest.kt
Now we are going to write a simple Kotlin application which will make an HTTP GET request to a server and deserialize the JSON into Kotlin object. We will use two data classes and then write a main function. Here is the code.
package com.stonesoupprogramming

import com.fasterxml.jackson.annotation.JsonIgnoreProperties
import org.springframework.web.client.RestTemplate

/**
 * The following data classes are instantiated by Jackson and converted from JSON to
 * objects. Normally, the class needs to have all of the properties in the JSON, but
 * we can change this by using the ignoreUnknown = true argument
 */
@JsonIgnoreProperties(ignoreUnknown = true)
data class Value(var id: Long = 0, var quote: String = "")

@JsonIgnoreProperties(ignoreUnknown = true)
data class Quote(var type : String = "", var value : Value? = null)

fun main (args : Array){
    //Create a new RestTemplate and use getForObject to make a GET request
    //to the server and return an instance of Quote representing the response
    val quote = RestTemplate().getForObject("http://gturnquist-quoters.cfapps.io/api/random", Quote::class.java)

    //Print the response to the console
    println(quote)
}
Our application begin by declaring two data classes which are Value and Quote. We annotate these classes with @JsonIgnoreProperties which allows the JSON deserializer to skip over JSON properties that are not present in our data classes. Otherwise, we would get a runtime exception. The JSON deserializer uses reflection (java based) to instantiate objects from the data classes so we need some form of a default constructor. We can do this a number of different ways in Kotlin, but I chose to use default values the properties in the data classes.
Next we have a main function. It starts by creating a new RestTemplate object and calling its getForObject method. The getForObject requires a web address and a class of the object to return. Then we call println on the returned Quote object to print the output to the console.
RestTemplate has methods for just about every HTTP verb so while this example only uses GET, you can do POST, PUT, DELETE and other common web requests.
Output
The output will different every time you run the application, but here is what I got when I ran it.
14:47:14.091 [main] WARN org.springframework.http.converter.json.Jackson2ObjectMapperBuilder - For Jackson Kotlin classes support please add "com.fasterxml.jackson.module:jackson-module-kotlin" to the classpath
14:47:14.156 [main] DEBUG org.springframework.web.client.RestTemplate - Created GET request for "http://gturnquist-quoters.cfapps.io/api/random"
14:47:14.247 [main] DEBUG org.springframework.web.client.RestTemplate - Setting request Accept header to [application/json, application/*+json]
14:47:14.321 [main] DEBUG org.springframework.web.client.RestTemplate - GET request for "http://gturnquist-quoters.cfapps.io/api/random" resulted in 200 (OK)
14:47:14.322 [main] DEBUG org.springframework.web.client.RestTemplate - Reading [class com.stonesoupprogramming.Quote] as "application/json;charset=UTF-8" using [org.springframework.http.converter.json.MappingJackson2HttpMessageConverter@cc43f62]
Quote(type=success, value=Value(id=1, quote=Working with Spring Boot is like pair-programming with the Spring developers.))
Conclusion
Here is the source document for this tutorial.
https://spring.io/guides/gs/consuming-rest/
You can get the code at my github at this address: https://github.com/archer920/consuming-rest
