Consuming REST with Spring and Kotlin

Spring 5 came with official support for Kotlin, a JVM language developed by Jetbrains which focuses on code clarity and conciseness. Many web applications today are a mockup of content from other websites, which are usually exposed with a web service. Consuming a web service is really easy when you use Spring’s RestTemplate class. This tutorial is an adaptation of the one found here, which has been modified to use the Kotlin language.

Project Structure

You will want to setup your project with a folder structure that is similar to the one shown in the screenshot below.

consuming_rest

build.gradle

Next you will want to use a dependency management system, either gradle or maven, which will see to the details of downloading your dependencies. We use gradle in this tutorial.

buildscript {
    ext.kotlin_version = '1.2.30'

    repositories {
        mavenCentral()
    }
    dependencies {
        classpath "org.jetbrains.kotlin:kotlin-gradle-plugin:$kotlin_version"
        classpath("org.springframework.boot:spring-boot-gradle-plugin:2.0.1.RELEASE")
    }
}

group 'com.stonesoupprogramming'
version '1.0-SNAPSHOT'

apply plugin: 'kotlin'
apply plugin: 'org.springframework.boot'
apply plugin: 'io.spring.dependency-management'

bootJar {
    baseName = 'gs-consuming-rest'
    version =  '0.1.0'
}

repositories {
    mavenCentral()
}

dependencies {
    compile "org.jetbrains.kotlin:kotlin-stdlib-jdk8:$kotlin_version"
    compile group: 'org.jetbrains.kotlin', name: 'kotlin-reflect', version: '$kotlin_version'
    compile("org.springframework.boot:spring-boot-starter")
    compile("org.springframework:spring-web")
    compile("com.fasterxml.jackson.core:jackson-databind")
}

compileKotlin {
    kotlinOptions.jvmTarget = "1.8"
}
compileTestKotlin {
    kotlinOptions.jvmTarget = "1.8"
}

ConsumingRest.kt

Now we are going to write a simple Kotlin application which will make an HTTP GET request to a server and deserialize the JSON into Kotlin object. We will use two data classes and then write a main function. Here is the code.

package com.stonesoupprogramming

import com.fasterxml.jackson.annotation.JsonIgnoreProperties
import org.springframework.web.client.RestTemplate

/**
 * The following data classes are instantiated by Jackson and converted from JSON to
 * objects. Normally, the class needs to have all of the properties in the JSON, but
 * we can change this by using the ignoreUnknown = true argument
 */
@JsonIgnoreProperties(ignoreUnknown = true)
data class Value(var id: Long = 0, var quote: String = "")

@JsonIgnoreProperties(ignoreUnknown = true)
data class Quote(var type : String = "", var value : Value? = null)

fun main (args : Array){
    //Create a new RestTemplate and use getForObject to make a GET request
    //to the server and return an instance of Quote representing the response
    val quote = RestTemplate().getForObject("http://gturnquist-quoters.cfapps.io/api/random", Quote::class.java)

    //Print the response to the console
    println(quote)
}

Our application begin by declaring two data classes which are Value and Quote. We annotate these classes with @JsonIgnoreProperties which allows the JSON deserializer to skip over JSON properties that are not present in our data classes. Otherwise, we would get a runtime exception. The JSON deserializer uses reflection (java based) to instantiate objects from the data classes so we need some form of a default constructor. We can do this a number of different ways in Kotlin, but I chose to use default values the properties in the data classes.

Next we have a main function. It starts by creating a new RestTemplate object and calling its getForObject method. The getForObject requires a web address and a class of the object to return. Then we call println on the returned Quote object to print the output to the console.

RestTemplate has methods for just about every HTTP verb so while this example only uses GET, you can do POST, PUT, DELETE and other common web requests.

Output

The output will different every time you run the application, but here is what I got when I ran it.

14:47:14.091 [main] WARN org.springframework.http.converter.json.Jackson2ObjectMapperBuilder - For Jackson Kotlin classes support please add "com.fasterxml.jackson.module:jackson-module-kotlin" to the classpath
14:47:14.156 [main] DEBUG org.springframework.web.client.RestTemplate - Created GET request for "http://gturnquist-quoters.cfapps.io/api/random"
14:47:14.247 [main] DEBUG org.springframework.web.client.RestTemplate - Setting request Accept header to [application/json, application/*+json]
14:47:14.321 [main] DEBUG org.springframework.web.client.RestTemplate - GET request for "http://gturnquist-quoters.cfapps.io/api/random" resulted in 200 (OK)
14:47:14.322 [main] DEBUG org.springframework.web.client.RestTemplate - Reading [class com.stonesoupprogramming.Quote] as "application/json;charset=UTF-8" using [org.springframework.http.converter.json.MappingJackson2HttpMessageConverter@cc43f62]
Quote(type=success, value=Value(id=1, quote=Working with Spring Boot is like pair-programming with the Spring developers.))

Conclusion

Here is the source document for this tutorial.

https://spring.io/guides/gs/consuming-rest/

You can get the code at my github at this address: https://github.com/archer920/consuming-rest
Kotlin Scheduling Tasks with Spring Boot

Kotlin is fully interoperable with Spring Boot which makes Spring and Kotlin a perfect companion to one another. Spring brings a high level platform that can be used for making just about any enterprise grade application, while Kotlin offers language features that make your code concise and readable. Both Kotlin and Spring do a great job of reducing boilerplate in your code so that you can write an application quickly and get to the point.

This tutorial is based on Scheduling Tasks found on the Spring website is an adapation of the tutorial for Kotlin. We will be using Kotlin, Spring Boot, and Gradle. You can find the code here.

Project Structure

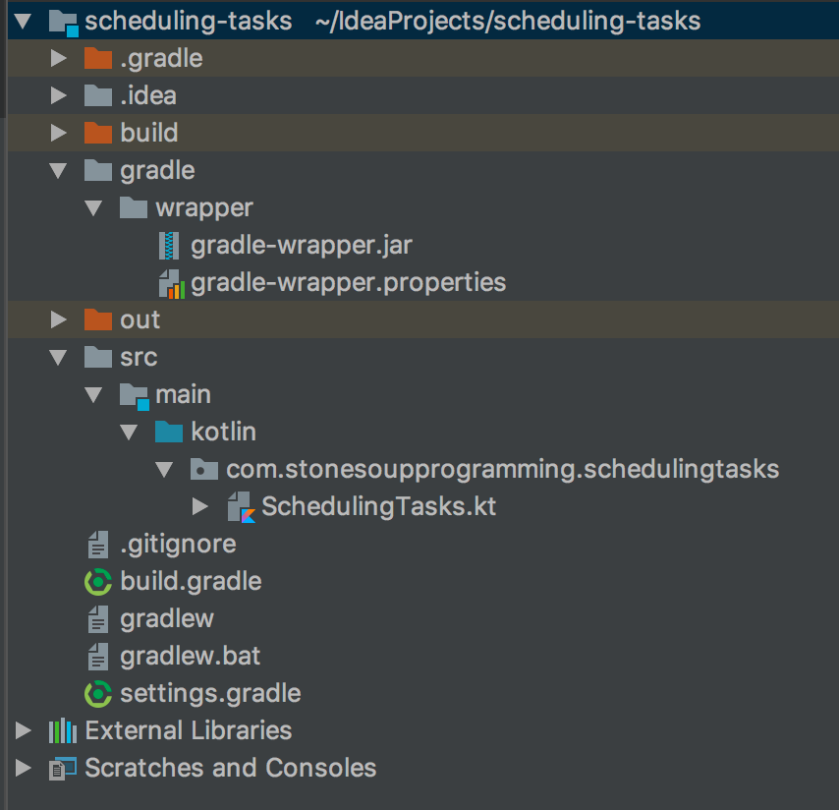
You should setup your project to use this folder structure.

scheduling_tasks

build.gradle

Here is the full code for your gradle.build file. Notice that will bring in both Kotlin and Spring libraries so that we can build the project.

buildscript {
    ext.kotlin_version = '1.2.30'

    repositories {
        mavenCentral()
    }
    dependencies {
        classpath "org.jetbrains.kotlin:kotlin-gradle-plugin:$kotlin_version"
        classpath "org.springframework.boot:spring-boot-gradle-plugin:2.0.1.RELEASE"
    }
}

group 'com.stonesoupprogramming'
version '1.0-SNAPSHOT'

apply plugin: 'kotlin'
apply plugin: 'java'
apply plugin: 'eclipse'
apply plugin: 'idea'
apply plugin: 'org.springframework.boot'
apply plugin: 'io.spring.dependency-management'

repositories {
    mavenCentral()
}

bootJar {
    baseName = 'gs-scheduling-tasks'
    version =  '0.1.0'
}

sourceCompatibility = 1.8
targetCompatibility = 1.8

dependencies {
    compile "org.springframework.boot:spring-boot-starter"
    compile "org.jetbrains.kotlin:kotlin-stdlib-jdk8:$kotlin_version"
    compile group: 'org.jetbrains.kotlin', name: 'kotlin-reflect', version: '1.2.30'
    testCompile "junit:junit"
}

compileKotlin {
    kotlinOptions.jvmTarget = "1.8"
}
compileTestKotlin {
    kotlinOptions.jvmTarget = "1.8"
}

SchedulingTasks.kt

Here is the Kotlin code followed by an explanation.

package com.stonesoupprogramming.schedulingtasks

import org.slf4j.LoggerFactory
import org.springframework.boot.SpringApplication
import org.springframework.boot.autoconfigure.SpringBootApplication
import org.springframework.scheduling.annotation.EnableScheduling
import org.springframework.scheduling.annotation.Scheduled
import org.springframework.stereotype.Component
import java.time.LocalDateTime
import java.time.format.DateTimeFormatter

/**
 * Mark this class an injectable component so that the Spring environment will create
 * an instance of this class when it starts up.
 */
@Component
class ScheduleTasks {

    private val logger = LoggerFactory.getLogger(ScheduleTasks::class.java)

    /**
     * This @Schedule annotation run every 5 seconds in this case. It can also
     * take a cron like syntax.
     * See https://docs.spring.io/spring/docs/current/javadoc-api/org/springframework/scheduling/support/CronSequenceGenerator.html
     */
    @Scheduled(fixedRate = 5000)
    fun reportTime(){
        logger.info("The time is now ${DateTimeFormatter.ISO_LOCAL_TIME.format(LocalDateTime.now())}")
    }
}

@SpringBootApplication
//Required to tell Spring to run tasks marked with @Scheduled
@EnableScheduling
open class Application

fun main(args : Array){
    SpringApplication.run(Application::class.java)
}

When run, you will get this output on your console every five seconds.

2018-04-06 18:51:21.868  INFO 20294 --- [pool-1-thread-1] c.s.schedulingtasks.ScheduleTasks        : The time is now 18:51:21.865
2018-04-06 18:51:26.858  INFO 20294 --- [pool-1-thread-1] c.s.schedulingtasks.ScheduleTasks        : The time is now 18:51:26.858

Explanation

So how does the code work? The ScheduleTasks class is annotaded with @Component, which the Spring environment scans for on start up and instantiates the class. At this point, an instance of ScheduleTasks lives in the ApplicationContent. You will notice that the ScheduleTasks::reportTime function is annotated with @Scheduled which defaults to a fix rate or can use a CRON like syntax.

You can’t annotate a method and expect it to run without turning on scheduling. That is why the Application class is annotated with @EnableScheduling. This will tell Spring to scan all container managed classes and look for the @Scheduled annotation. The Spring environment will do the job of making sure that the methods run at the proper time.

Code

You can get the code for this tutorial at my GitHub: https://github.com/archer920/scheduling-tasks

Sources

https://spring.io/guides/gs/scheduling-tasks/
https://docs.spring.io/spring/docs/current/javadoc-api/org/springframework/scheduling/support/CronSequenceGenerator.html

Build a RESTful Web Service with Kotlin

Introduction

Spring and Kotlin combine together to create a powerhouse when it comes to rapid application development. The Spring project is a powerful framework that allows you to develop an application quickly with as little boilerplate and configuration code as possible. Kotlin is a language that is developed Jetbrains that focuses on code readability and conciseness. This guide will show you how to build a RESTful web service using Spring Boot and Kotlin.

Getting Started

We will use a Maven project to mranage the resources that this application will need. Your project will need the following folder skeleton before you can continue.

Maven

After you have created your project skeleton you can continue.

pom.xml

The pom.xml file is used by Maven to manage all of your project dependencies. You can copy and paste this code into your pom.xml file, which will pull in all of the Spring Boot and Kotlin dependencies.


    4.0.0

    stonesoupprogramming
    BuildingRESTfulWebService
    1.0-SNAPSHOT

    
        1.2.31


        org.springframework.boot
        spring-boot-starter-parent
        2.0.0.RELEASE


            org.jetbrains.kotlin
            kotlin-stdlib-jdk8
            ${kotlin.version}
        
        
            org.jetbrains.kotlin
            kotlin-reflect
            ${kotlin.version}
        
        
            org.reflections
            reflections
            0.9.10
        
        
            org.jetbrains.kotlin
            kotlin-test
            ${kotlin.version}
            test


            org.springframework.boot
            spring-boot-starter-web
        
        
            org.springframework.boot
            spring-boot-starter-test
            test
        
        
            com.jayway.jsonpath
            json-path
            test


        src/main/kotlin
        
            
                org.springframework.boot
                spring-boot-maven-plugin
            
            
                org.jetbrains.kotlin
                kotlin-maven-plugin
                ${kotlin.version}
                
                    
                        compile
                        compile
                        
                            compile


                        test-compile
                        test-compile
                        
                            test-compile


                    1.8


            spring-releases
            https://repo.spring.io/libs-release


            spring-releases
            https://repo.spring.io/libs-release


Application.kt

Kotlin is a language that is meant to be concise, which plays to our advantage. We will hold all of our classes inside of the Application.kt file.

package com.stonesoupprogramming.spring.boot

import org.springframework.boot.SpringApplication
import org.springframework.boot.autoconfigure.SpringBootApplication
import org.springframework.web.bind.annotation.RequestMapping
import org.springframework.web.bind.annotation.RequestParam
import org.springframework.web.bind.annotation.RestController
import java.util.concurrent.atomic.AtomicLong

/**
 * This class gets converted into JSON and serves as our data model.
 * We can use Kotlin's data class feature to make it only one line of code.
 */
data class Greeting (val id : Long, val content : String)

/**
 * The @RestController annotation tells the Spring Environment to
 * use this class to handle REST requests. That means that it will handle
 * HTTP requests but does not use a view technology to write the response.
 * Instead, an instance of Greeting is simply converted into JSON and written
 * to the HTTP response body.
 */
@RestController
class GreetingController {

    private val counter : AtomicLong = AtomicLong()

    /**
     * The @RequestMapping signals that this method will handle
     * HTTP requests to /greeting. We can narrow it down to GET, POST, PUT, etc
     * when we want different methods to handle different requests
     * at this endpoint.
     *
     * The name parameter is annotated with @RequestParam which has
     * two arguments. The name argument maps the request parameter name to
     * the name argument in this method. The defaultValue will populate
     * name with the value "World" if the request does not have a name argument.
     */
    @RequestMapping("/greeting")
    fun greeting(@RequestParam(value="name", defaultValue="World") name : String) : Greeting {
        return Greeting(counter.incrementAndGet(), "Hello $name")
    }
}

/**
 * The @SpringBootApplication is a meta annotation that makes
 * this application executable.
 */
@SpringBootApplication
open class Application

/**
 * Now we just need an entry point to the program.
 */
fun main(args : Array){
    SpringApplication.run(Application::class.java, *args)
}

Let’s break the code down into each piece.

Greeting

Greeting is a data class that has two fields, id and content. Kotlin introduced data classes to cut down on boilerplate code when using POJOs (Plain old java object). It will have all of the getters, equals, hashcode, and toString() as well as a constructor. This class will get converted into JSON and written to the response body later on in the application.

GreetingController

Spring works on a Model, View, Controller architecture so it uses Controller classes to map web requests to backend code. In this case, we are using @RestController to specify that we are not using a view technology to generate HTML and are instead going to write JSON to the HTML response body.

This class only has one method, greeting, which is annotated with @RequestMapping. You will use @RequestMapping to map HTTP requests to a method in the class. In our case, we are mapping all requests (GET, PUT, POST, DELETE) to /greeting to our greeting method. The greeting method has one argument, name, which is also annotated with @RequestParam.

The @RequestParam has two arguments, value which specifies the name of the argument in the request and the default value if the argument is not present in the request. In our case, we also called the request parameter name and we have it default to World. Inside of the method, we return a new instance of Greeting and then return it. The Spring environment will see to the details of converting it to JSON and writing it to the response.

Application

We also have an empty Application class that is marked with the @SpringBootApplication annotation. This is a meta-annotation that pulls in all of the annotations that are needed to make this program executable. We using it in the main function to start the program.

Finishing

After you start the application, you can point your browser to

http://localhost:8080/greeting and then http://localhost:8080/greeting?name=User to see the JSON output of this application.

Sources

https://spring.io/guides/gs/rest-service/

https://kotlinlang.org/docs/reference/

Source

The source code for this project is available on my github here: https://github.com/archer920/BuildingRESTfulWebService

Kotlin Spring Data Delegation

Kotlin provides many features that can be really useful when working with Spring. I was doing a website for my fiancee where I found an excellent use case of Kotlin’s Delegation and Extension function that I am going to share with readers today.

Code

KotlinDelegationApplication.kt

package com.stonesoupprogramming.delegation.kotlindelegation

import org.hibernate.validator.constraints.NotBlank
import org.springframework.beans.factory.annotation.Autowired
import org.springframework.boot.SpringApplication
import org.springframework.boot.autoconfigure.SpringBootApplication
import org.springframework.data.jpa.repository.JpaRepository
import org.springframework.stereotype.Controller
import org.springframework.stereotype.Service
import org.springframework.ui.Model
import org.springframework.validation.BindingResult
import org.springframework.web.bind.annotation.GetMapping
import org.springframework.web.bind.annotation.ModelAttribute
import org.springframework.web.bind.annotation.PostMapping
import org.springframework.web.bind.annotation.RequestMapping
import javax.persistence.Entity
import javax.persistence.GeneratedValue
import javax.persistence.Id
import javax.transaction.Transactional
import javax.validation.Valid
import javax.validation.constraints.NotNull

@SpringBootApplication
class KotlinDelegationApplication

enum class FamilyMemberType {Father, Mother, Daughter, Son}

//Basic entity class
@Entity
data class Belchers(
        @field: Id
        @field: GeneratedValue
        var id : Long? = null,

        @field: NotBlank(message = "Need a name!")
        var name : String = "",

        @field: NotNull(message = "Assign to a family type")
        var familyMemberType: FamilyMemberType? = null
)

//Now we are going to define a JpaRepository to handle persistence
interface BelchersRepository : JpaRepository

//Here is a service class that contains our business logic
@Service
@Transactional
class BelchersService(
        //Inject an instance of BelchersRepository
        @field : Autowired
        val belchersRepository: BelchersRepository) : BelchersRepository by belchersRepository {
    /**
     * The above line demonstrates Kotlin's delegation syntax. It works by specifying a variable whose type
     * is an interface (no concrete or abstract classes). After the colon, we specify the name of the interface
     * and the variable that provides the object we are using for delegation. The Kotlin compiler builds out all of
     * methods included in the interface and routes calls to those method to the delegate object.
     *
     * In this example, BelcherService gets all of the methods included in BelchersRepository and the belcherRepository
     * object handles the implementation of all BelcherRepository method unless we override them.
     */

    /**
     * Here is an example of where we override only one method of BelchersRepository
     *  so that we can customize the behavior.
     */
    override fun <s> save(entity: S): S {
        val formattedName = entity?.name?.split(" ")?.map { it.toLowerCase().capitalize() }?.joinToString(" ")
        if(formattedName != null){
            entity.name = formattedName
        }
        return belchersRepository.save(entity)
    }
}

//Example MVC controller
@Controller
@RequestMapping("/")
class IndexController (
        @field: Autowired
        val belchersService: BelchersService) {

    @ModelAttribute("belcherFamily")
    fun fetchFamily() = belchersService.findAll()

    @ModelAttribute("belcher")
    fun fetchBelcher() = Belchers()

    @GetMapping
    fun doGet() = "index"

    @PostMapping
    fun doPost(@Valid belcher : Belchers, bindingResult: BindingResult, model: Model) : String {
        var entity = belcher

        if(!bindingResult.hasErrors()){
            belchersService.save(belcher)
            entity = Belchers()
        }

        //Notice the use of extension functions to keep the code concise
        model.addBelcher(entity)
        model.addBelcherFamily()

        return "index"
    }

    //Some private extension functions which tend to be really useful in Spring MVC
    private fun Model.addBelcherFamily(){
        addAttribute("belcherFamily", belchersService.findAll())
    }

    private fun Model.addBelcher(belcher: Belchers = Belchers()){
        addAttribute("belcher", belcher)
    }
}

fun main(args: Array) {
    SpringApplication.run(KotlinDelegationApplication::class.java, *args)
}

index.html

<!DOCTYPE html>
<html lang="en" xmlns="http://www.w3.org/1999/xhtml"
      xmlns:th="http://www.thymeleaf.org">
<head>
    <meta charset="UTF-8">
    <title>Kotlin Delegation Example</title>

    <script src="http://code.jquery.com/jquery-3.2.1.js"
            integrity="sha256-DZAnKJ/6XZ9si04Hgrsxu/8s717jcIzLy3oi35EouyE="
            crossorigin="anonymous"></script>

    <!-- Latest compiled and minified CSS & JS -->
    <link rel="stylesheet" media="screen" href="https://maxcdn.bootstrapcdn.com/bootstrap/3.3.7/css/bootstrap.min.css">
    <script src="https://maxcdn.bootstrapcdn.com/bootstrap/3.3.7/js/bootstrap.min.js"></script>

    <style>
        button {
            margin-top: 10px;
        }
    </style>
</head>
<body>
<div class="jumbotron">
    <div class="container">
        <h1>Kotlin Delegation</h1>
        <p>Web demonstration showing how Kotlin's delegation features pairs with Spring Data</p>
    </div>
</div>

<div class="container">
    <div class="row" th:if="${belcherFamily.size() > 0}">
        <div class="col-xs-12 col-sm-12 col-md-12 col-lg-12">
            <table class="table table-striped table-hover">
                <thead>
                <tr>
                    <th>ID</th>
                    <th>Name</th>
                    <th>Family Member Type</th>
                </tr>
                </thead>
                <tbody>
                <tr th:each="belcher : ${belcherFamily}">
                    <td th:text="${belcher.id}"></td>
                    <td th:text="${belcher.name}"></td>
                    <td th:text="${belcher.familyMemberType}"></td>
                </tr>
                </tbody>
            </table>
        </div>
    </div>

    <div class="row">
        <div class="col-xs-12 col-sm-12 col-md-12 col-lg-12">
            <form th:action="@{/}" method="post" th:object="${belcher}">
                <legend>Add a Family Member</legend>

                <div th:class="${#fields.hasErrors('name') ? 'form-group has-error' : 'form-group'}">
                    <label for="name">Name</label>
                    <input class="form-control" name="name" id="name" th:field="*{name}" />
                    <span th:if="${#fields.hasErrors('name')}" th:errors="*{name}" class="help-block"></span>
                </div>

                <select name="type" id="type" class="form-control" th:field="*{familyMemberType}">
                    <option th:each="value : ${T(com.stonesoupprogramming.delegation.kotlindelegation.FamilyMemberType).values()}"
                            th:value="${value}" th:text="${value}" />
                </select>

                <button class="btn btn-primary">Submit</button>
            </form>
        </div>
    </div>
</div>
</body>
</html>

pom.xml

<?xml version="1.0" encoding="UTF-8"?>
<project xmlns="http://maven.apache.org/POM/4.0.0" xmlns:xsi="http://www.w3.org/2001/XMLSchema-instance" 	xsi:schemaLocation="http://maven.apache.org/POM/4.0.0 http://maven.apache.org/xsd/maven-4.0.0.xsd">
	<modelVersion>4.0.0</modelVersion>

	<groupId>com.stonesoupprogramming.delegation</groupId>
	<artifactId>kotlin-delegation</artifactId>
	<version>0.0.1-SNAPSHOT</version>
	<packaging>jar</packaging>

	<name>kotlin-delegation</name>
	<description>Demo project for Spring Boot</description>

	<parent>
		<groupId>org.springframework.boot</groupId>
		<artifactId>spring-boot-starter-parent</artifactId>
		<version>1.5.6.RELEASE</version>
		<relativePath/> <!-- lookup parent from repository -->
	</parent>

	<properties>
		<kotlin.compiler.incremental>true</kotlin.compiler.incremental>
		<project.build.sourceEncoding>UTF-8</project.build.sourceEncoding>
		<project.reporting.outputEncoding>UTF-8</project.reporting.outputEncoding>
		<java.version>1.8</java.version>
		<kotlin.version>1.1.3-2</kotlin.version>
		<thymeleaf.version>3.0.2.RELEASE</thymeleaf.version>
		<thymeleaf-layout-dialect.version>2.1.1</thymeleaf-layout-dialect.version>
	</properties>

	<dependencies>
		<dependency>
			<groupId>org.springframework.boot</groupId>
			<artifactId>spring-boot-starter-data-jpa</artifactId>
		</dependency>
		<dependency>
			<groupId>org.springframework.boot</groupId>
			<artifactId>spring-boot-starter-thymeleaf</artifactId>
		</dependency>
		<dependency>
			<groupId>org.springframework.boot</groupId>
			<artifactId>spring-boot-starter-web</artifactId>
		</dependency>
		<dependency>
			<groupId>org.springframework.boot</groupId>
			<artifactId>spring-boot-devtools</artifactId>
			<scope>runtime</scope>
		</dependency>
		<dependency>
			<groupId>org.hsqldb</groupId>
			<artifactId>hsqldb</artifactId>
			<scope>runtime</scope>
		</dependency>
		<dependency>
			<groupId>org.jetbrains.kotlin</groupId>
			<artifactId>kotlin-stdlib-jre8</artifactId>
			<version>${kotlin.version}</version>
		</dependency>
		<dependency>
			<groupId>org.jetbrains.kotlin</groupId>
			<artifactId>kotlin-reflect</artifactId>
			<version>${kotlin.version}</version>
		</dependency>

		<dependency>
			<groupId>org.springframework.boot</groupId>
			<artifactId>spring-boot-starter-test</artifactId>
			<scope>test</scope>
		</dependency>
	</dependencies>

	<build>
		<sourceDirectory>${project.basedir}/src/main/kotlin</sourceDirectory>
		<testSourceDirectory>${project.basedir}/src/test/kotlin</testSourceDirectory>
		<plugins>
			<plugin>
				<groupId>org.springframework.boot</groupId>
				<artifactId>spring-boot-maven-plugin</artifactId>
			</plugin>
			<plugin>
				<artifactId>kotlin-maven-plugin</artifactId>
				<groupId>org.jetbrains.kotlin</groupId>
				<version>${kotlin.version}</version>
				<configuration>
					<compilerPlugins>
						<plugin>spring</plugin>
					</compilerPlugins>
					<jvmTarget>1.8</jvmTarget>
				</configuration>
				<executions>
					<execution>
						<id>compile</id>
						<phase>compile</phase>
						<goals>
							<goal>compile</goal>
						</goals>
					</execution>
					<execution>
						<id>test-compile</id>
						<phase>test-compile</phase>
						<goals>
							<goal>test-compile</goal>
						</goals>
					</execution>
				</executions>
				<dependencies>
					<dependency>
						<groupId>org.jetbrains.kotlin</groupId>
						<artifactId>kotlin-maven-allopen</artifactId>
						<version>${kotlin.version}</version>
					</dependency>
				</dependencies>
			</plugin>
		</plugins>
	</build>

</project>

application.properties

spring.thymeleaf.mode= HTML
spring.thymeleaf.cache=false

Project Structure

structures copy

Explanation

Most developers are familiar with the delegation pattern. Delegation provides many of the same benefits as inheritence, but helps reduce issues such as fragile base classes or tight coupling to the base class. Kotlin’s delegation features go further by requiring developers to use an interface which helps promote loose coupling and programming to an interface. Since delegate objects aren’t part of an inheritance chain, we are free to use mutliple objects with delegation.

One of the huge drawbacks of using the delegation pattern in Java is the amount of work involved to use the pattern. Java requires developers to actually declare and implement each method of the delegate object. Although most IDE’s are happy to generate delegate methods, such methods require maintaince later on should an interface add or remove methods. This makes inheritence more attractive since the Java compiler adds or removes methods in child classes as they are added or removed in the base class without additional work from the developer.

The Kotlin compiler address the problems associated with developing delegate objects by generating the delegate methods for the developer. The Kotlin delegation syntax is found in KotlinDelegationApplication.kt on lines 48-51. As mentioned above, Kotlin requires the usage of interfaces when using delegation. This works nicely with Spring Data’s JPA template, since developers simply declare an interface that extends JpaRepository anyway. The delegation pattern is used in the BelchersService class, which takes an instance of BelchersRepository in its constructor and then uses the object to build out delegate methods.

At this point, BelcherService has the same methods as BelcherRepository without the need to generate boilerplate declarations and implementations to the delegate object. Since the code is loosely coupled, we are free to swap out different implementations of BelcherRepository as required. The code is easier to read because we are spared the boilerplate code required to implement the delegation pattern.

You may view the source at https://github.com/archer920/KotlinDelegation

Spring Security @RolesAllowed JSR250 Kotlin

Although Spring Security provides means to secure the web tier using XML markup, it’s also critically important that developers also secure backend method to ensure that methods. This post demosntrates an application in which a developer forgot to secure a web form but luckily the backend code is secured and provides a safe guard against such an error.

Enabling JSR250

Spring Boot takes a declaritive approaching to enabling method security, but we also need to provide it with an authentication manager.

@Configuration
@EnableJpaRepositories
//The next annotation enabled @RolesAllowed annotation
@EnableGlobalMethodSecurity(jsr250Enabled = true)
//We need to extend GlobalMethodSecurityConfiguration and override the configure method
//This will allow us to secure methods
class MethodSecurityConfig : GlobalMethodSecurityConfiguration(){

    override fun configure(auth: AuthenticationManagerBuilder) {
        //In our case, we are going to use an in memory authentication
        configureAuthentication(auth)
    }
}

fun configureAuthentication(auth: AuthenticationManagerBuilder){
    auth
            .inMemoryAuthentication()
            .withUser("bob").password("bob").roles("ADMIN", "USER")
            .and()
            .withUser("gene").password("gene").roles( "USER")
}

We create a class that extends GlobalMethodSecurityConfiguration. We turn the method security on by annotating this class with @EnableGlobalMethodSecurity. By default, Spring uses it’s own @Secured annotation so if we want to use the JSR standard, we need to pass true to the jsr250Enabled annotation. Then our MethodSecurityConfig class needs to override the configure method and add an authentication scheme.

Readers may be wondering what the difference is between @Secured and @RolesAllowed annotations. There doesn’t seem to be much as both annotations seem to do the same thing. There is the possibility that other software libraries may act on @RolesAllowed and if there is such as concern, then use @Secured.

Securing Methods

Once we have enabled method security, we only need to decorate our specific methods. Here is a service class used in the example application.

@Transactional
//This is our class that we are going to secure
class BurgerService(@Autowired val burgerRepository: BurgerRepository){

    @PostConstruct
    fun init(){
        //Just popuplates the DB for the example application
        val burgers = listOf(
                BurgerOfTheDay(name = "New Bacon-ings"),
                BurgerOfTheDay(name = "Last of the Mo-Jicama Burger"),
                BurgerOfTheDay(name = "Little Swiss Bunshine Burger"),
                BurgerOfTheDay(name = "Itsy Bitsy Teeny Weenie Yellow Polka-Dot Zucchini Burger"))
        burgerRepository.save(burgers)
    }

    @PreDestroy
    fun destory(){
        //Clean up the DB when done
        burgerRepository.deleteAll()
    }

    //Any user can add a new BurgerOfTheDay
    @RolesAllowed(value = *arrayOf("USER", "ADMIN"))
    fun saveBurger(burgerOfTheDay: BurgerOfTheDay) = burgerRepository.save(burgerOfTheDay)

    //But only adminstrators get to delete burgers
    @RolesAllowed(value = "ADMIN")
    fun deleteBurger(id : Long) = burgerRepository.delete(id)

    //Any user gets to see our Burgers
    @RolesAllowed(value = *arrayOf("USER", "ADMIN"))
    fun allBurgers() = burgerRepository.findAll()
}

The @RolesAllows annotation takes an array of allowed roles. In our case, we are letting anyone with the USER role to add burgers, but only ADMIN users are allowed to delete burgers. If a user without the ADMIN role attempts to invoke deleteBurger, an AccessDeniedException is thrown.

Catching Security Violations

Kotlin has no concept of checked exceptions, but Java users should note that Spring’s security exceptions are all RuntimeExceptions. If we want to report a security violation back to the user, we need to catch our security exceptions. Here is an example Controller class that handles security violations.

@Controller
class IndexController(
        @Autowired val logger : Logger,
        @Autowired val burgerService: BurgerService) {

    @GetMapping("/")
    fun doGet(model : Model) : String {
        model.addAttribute("burgers", burgerService.allBurgers().toList())
        return "index"
    }

    @PostMapping("/add")
    fun saveBurger(
            @RequestParam("burgerName") burgerName : String,
            model : Model) : String {
        try {
            burgerService.saveBurger(BurgerOfTheDay(name=burgerName))
            model.addAttribute("burgers", burgerService.allBurgers().toList())
            model.addAttribute("info", "Burger has been added")
        } catch (e : Exception){
            when (e){
                is AccessDeniedException -&gt; {
                    logger.info("Security Exception")
                }
                else -&gt; logger.error(e.toString(), e)
            }
        } finally {
            return "index"
        }
    }

    @PostMapping("/delete")
    fun deleteBurgers(
            @RequestParam("ids") ids : LongArray,
                      model: Model) : String {

        var errorThrown = false

        ids.forEach {
            try {
                burgerService.deleteBurger(it)

                //If the user doesn't have permission to invoke a method,
                //we will get AccessDeniedException which we handle and notify the user of the error
            } catch (e : Exception){
                when (e) {
                    is AccessDeniedException -&gt; {
                        model.addAttribute("error", "Only Bob gets to delete burgers!")
                        logger.info("Security error")
                    }
                    else -&gt; logger.error(e.toString(), e)
                }
                errorThrown = true
            }
        }
        model.addAttribute("burgers", burgerService.allBurgers().toList())
        if(!errorThrown){
            model.addAttribute("info", "Deleted burgers")
        }
        return "index"
    }
}

You’ll ntoice that the deleteBurgers method looks for AccessDeniedException (which is handled by Koltin’s powerful when block). In our case, we report an error that only Bob get’s to delete burgers.

Putting it all together

Here is a video of a sample web application that demonstrates this code in action.

The code for the example application is available at my GitHub page.

You can also learn more about Spring MVC by referring to the following posts.

Spring Boot Caching with Kotlin

It’s fairly common for applications to continually ask a datastore for the same information repeatedly. Requests to datastores consume application resources and thus have a performance cost even when the requested data is small. The Spring Platform provides a solution allows applications to store information in an in memory caching system that allows applications to check the cache for the required data prior to making a call to the database. This example shows how to use Spring Boot and Kotlin to cache files that we are storing in the database.

Database Entity

We are going to define a database entity that stores files in a database. Since retrieving such data can be an expesive call to the database, we are going to cache this entity.

@Entity
data class PersistedFile(
        @field: Id @field: GeneratedValue var id : Long = 0,
        var fileName : String = "",
        var mime : String = "",
        @field : Lob var bytes : ByteArray? = null)

You will notice that this class has a ByteArray field that is stored as a LOB in the database. In theory, this could be as many bytes as the system allows so ideally we would store this in cache. Other good candidates are entity classes that have complex object graphs and may result in the ORM generated complex SQL to retreive the managed object.

Enable Caching

Spring Boot defines a CachingManager internally for the application. You are free to use your own, but you need to configure your Spring Boot environment first.

Dependencies

You need to have spring-boot-starter-cache in your pom.xml or other dependency manager.


    org.springframework.boot
    spring-boot-starter-web

Annotation

You also need to tell the environment to turn on caching by using the @EnableCaching

@SpringBootApplication
@EnableJpaRepositories
@EnableCaching  //Spring Boot provides a CacheManager our of the box
                //but it only turns on when this annotation is present
class CachingTutorialApplication

Decorate the Caching Methods

At this point, we only need to decorate the methods we want the environment cache. This is done by decorating our methods with the @Cacheable annotation and then providing the annotation with the name of a cache. We can also optionally tell the cache manager what to use for the key. Here is the code for our service class followed by an explanation.

//We are going to use this class to handle caching of our PersistedFile object
//Normally, we would encapsulate our repository, but we are leaving it public to keep the code down
@Service
class PersistedFileService(@Autowired val persistedFileRepository: PersistedFileRepository){

    //This annotation will cause the cache to store a persistedFile in memory
    //so that the program doesn't have to hit the DB each time for the file.
    //This will result in faster page load times. Since we know that managed objects
    //have unique primary keys, we can just use the primary key for the cache key
    @Cacheable(cacheNames = arrayOf("persistedFile"), key="#id")
    fun findOne(id : Long) : PersistedFile = persistedFileRepository.findOne(id)

    //This annotation will cause the cache to store persistedFile ids
    //By storing the ids, we don't need to hit the DB to know if a file exists first
    @Cacheable(cacheNames = arrayOf("persistedIds"))
    fun exists(id: Long?): Boolean = persistedFileRepository.exists(id)
}

The first method, findOne, is used to look up a persistedFile object from the database. You will notice that we pass persistedFile as an argument to cacheNames and then use the primary key as the key for this item’s cache. We can use the PK because we know it’s a unique value so we can help make the cache more performant. However, keep in mind that the key is optional.

We can also avoid another call to the database by storing if items exist in the database in the cache. The first time exists() is called, the application will fire a count sql statement to the database. On subsequent calls, the cache will simply return true or false depending on what is stored in the cache.

Putting it all together

I put together a small web application that demonstates the caching working together. I turned on the show sql property in the applications.properties file so that viewers can see when the application is making calls to the database. You will notice that the first time I retreive the persisted file, there is sql generated. However, on the second call to the same object, no sql is generated because the application isn’t making a call to the database.

You can get the complete code from my GitHub page at this link.

Here are some links to posts that are related to concepts used in Spring Boot that we used today.

Spring Boot Kotlin & MongoDB

MongoDB is a NoSQL database that works really well with Kotlin and Spring Boot. MongoDB is incredibly useful in situations where the structure of data isn’t known prior to writing the application. For example, picture a blogging website where users can enter any number of comments or response. Modeling such a data structure would be difficult in a relational database, but it’s much easier with Mongo.

In this example application, we are going to use MongoDB to document Restaurants with any number of employees (of course, a simple example such as this can be done in a relational database, but let’s go with this for simplicity sake). The cool part using Mongo with Spring Boot is that there is zero configuration providing you are using default settings. This let’s us jump right into our code.

Let’s begin by creating a couple of data classes to store in our database.

//Create a document class
//that persists to the DB
@Document
data class Restaurant(
        //Mark this field as the document id
        @field: Id var name : String = "",
        //Unstructured Data Here
        var employees : List = mutableListOf())

//This class embeds directly into Restaurant
//without any annotations
data class Employee(var name : String = "",
                    var position : String = "")

Our Restaurant class is annotated with @Document to mark it as a persistable class. We also annotate the name field with the Id annotation to mark it as the document id. This value has to be unique in the database. The other class is Employee which does not have any annotations at all. It’s used as a property in the Employees database and the persistence provide is able store all of employee objects embedded in Restaurant.

Our next class is a repository class which Spring will generate the implementation for us. Before this can happen, we have to enable mongo repositories. All we need to do is annotate a configuration class to make this happen.

@Configuration
@EnableMongoRepositories //Allow Spring to Generate Mongo Repositories
class Config

Once we have enabled the mongo repositories, we just need to define an interface that extends MongoRespository.

//Spring will implement our interface for us!
interface RestaurantRepository : MongoRepository

Now let’s make a controller class to test our application. See this post for an explanation of Spring MVC.

//Example Controller class for demonstration purposes
@Controller
@RequestMapping("/")
class IndexController(
        //We can inject our RestaurantRepository class, Spring will
        //provide an implementation
        @Autowired private val restaurantRepository: RestaurantRepository){

    @RequestMapping(method = arrayOf(RequestMethod.GET))
    fun doGet(model : Model) : String {
        model.apply {
            addAttribute("restaurant", Restaurant())
            //Query all Restaurants
            addAttribute("allRestaurants", restaurantRepository.findAll())
        }
        return "index"
    }

    @RequestMapping(method = arrayOf(RequestMethod.POST))
    fun doPost(@RequestParam("name") name : String,
               @RequestParam("employees") employees : String,
               model : Model) : String {
        val restaurant = Restaurant(name = name,
                                    employees = parseEmployees(employees))
        //Save the new restaurant
        restaurantRepository.save(restaurant)
        model.apply {
            addAttribute("restaurant", Restaurant())
            //Query all Restaurants
            addAttribute("allRestaurants", restaurantRepository.findAll())
        }
        return "index"
    }

    fun parseEmployees(employees : String) : List {
        val employeeList = mutableListOf()
        val parts = employees.split('\n')

        parts.forEach {
            val subParts = it.split(",")
            employeeList.add(
                    Employee(name = subParts[0],
                            position = subParts[1]))
        }
        return employeeList.toList()
    }
}

Notice that we can directly inject RestaurantRepository into our controller. Spring does the work of providing an implementation for our controller class. In our doPost() method, we call restaurantRepository.save() to save our new document. In both doGet() and doPost(), we call restaurantRepository.findAll() to pull back all of our restaurants stored in the database.

Now we just need an HTML template to provide us with front end code.
indexcode

Conclusion

Here is an example of the application when run.


As you can see, Spring Boot combined with Kotlin makes it really easy to persist data into MongoDB. We only need to define a few data classes and allow Spring to make our Repository classes for us in order to get started.

You can view the code for this project at my GitHub page at this link.

Spring Boot JPA Kotlin

Spring Boot provides a ready made solution to working with Java Persistence API (JPA). The post discusses how to make a basic web application that reads and writes employees to a database. We can also count how many employees have a certain name. This will all be done using Spring’s JPA features and the Kotlin programming language.

Spring Boot provides us with a data source on its own with very little configuration. Of course, we are free to connect the application to remote databases as well. To get started, we need to fill out some properties in the application.properties file found in src/main/resources

application.properties

spring.jpa.hibernate.ddl-auto=create-drop
spring.jpa.properties.hibernate.current_session_context_class=org.springframework.orm.hibernate5.SpringSessionContext
spring.datasource.driver-class-name=org.hsqldb.jdbcDriver

The first property, spring.jpa.hibernate.ddl-auto=create-drop tells the application to scan for all classes annotated with @Entity and create database tables for us. The persistence provider does the work of generating database definition language (DDL) and creating our database schema for us.

The second property configures Hibernate to act as our persistence provider. This is required because JPA is a specification. It requires a 3rd party library (Hibernate, EclipseLink, etc) to actually implement the specification. Finally, we need to tell the application what JDBC driver to use. This should match our database. In this case, we are using HSQLDB so we load their JDBC driver.

Database Entity

We need to create one or more persistant objects that are mapped to the database. In this case, we only have 1, an Employee Class, that we are using to map to a database table.

//This class maps to a table in the database
//that will get created for us
@Entity
data class Employee(
       @field: Id @field: GeneratedValue var Id : Long = 0, //Primary Key
       var name : String = "", //Column
       var position : String = "") //Column

Kotlin provides data classes for these sort of situations. The first property is annotated with Id and serves as the Primary Key. The GeneratedValue annotation tells the persistence provider to generate primary key values for us. The other two properties, name and position, end up becoming columns in the database table. When persistence provider scans this class, it will issue the correct commands to the database and generate an employee table with an primary key columna and two VARCHAR columns. Each instance of the Employee class that we store will become a record in the table.

Automatic Repositories

Spring is capable of generating @Repository classes for use when working with JPA. These repositories come fully loaded with 18 methods that handle all of our CRUD (create, read, update, and delete) methods and provide container managed transactions. We can even create our own custom queries using a naming convention and Spring will infer what needs to be done.

However, before we can have Spring generate our repositories for us, we need to tell it to do so. That’s pretty easy because all we need is a small configuration class.

Config

@Configuration
//The next line tells Spring Generate our JPA Repositories
@EnableJpaRepositories(basePackages = arrayOf("com.stonesoupprogramming.jpa"))
class Config

The package passed to the @EnableJpaReposities tells Spring where to look for repository interfaces. In order to make a Repository for the Employee class, we only need to declare an interface that extends JpaRepository.

EmployeeRepository

//The Implementation for this class is generated
//by Spring Data!
interface EmployeeRepository : JpaRepository <Employee, Long>{

    //Define a custom query using Spring Data
    fun countByNameContainingIgnoringCase(name : String) : Long
}

At no point will we ever write an implementation for this interface. When Spring sees this interface, it will generate an implementation class that is fully loaded and ready for our application to use. Technically, this interface could be empty, but we do have one method countByNameContainingIgnoringCase(String). Let’s discuss it.

Spring JPA Repositories are capable of defining queries on our persiteted objects provided that we follow the proper naming convention. Let’s take apart countByNameContainingIgnoringCase and discuss what each part means.

  • count — We are defining a count query
  • ByName — The syntax here is By[Property]. Our Employee class has a Name property, so we write ByName. If we wanted to use Position instead, it would be ByPosition
  • ContainingIgnoringCase — This is the predicate of the query. We are looking for anything containing a string value (in this case) and we are ignoring the case.

So in the end countByNameContainingIgnoringCase defines a query that means what it says. We are going to get a count of all records where the name contains a certain name and the name is not case sensitive. Spring is able to parse this name and create the correct query for us.

Put it in Action!

I wrote an MVC application that demonstrates how to use these concepts in a web application. Here is the code for the controller.

@Controller
@RequestMapping("/")
class IndexController(@Autowired private val employeeRepository: EmployeeRepository) {

    @RequestMapping(method = arrayOf(RequestMethod.GET))
    fun doGet(model : Model) : String {
        model.apply {
            addAttribute("employee", Employee())
            addAttribute("showName", false)
            addAttribute("employees", employeeRepository.findAll().toList())
        }
        return "index"
    }

    @RequestMapping("/employee_save", method = arrayOf(RequestMethod.POST))
    fun doEmployeeSave(employee: Employee,
                       model : Model) : String {
        employeeRepository.save(employee)
        model.apply {
            addAttribute("employee", Employee())
            addAttribute("showName", false)
            addAttribute("employees", employeeRepository.findAll().toList())
        }
        return "index"
    }

    @RequestMapping("/employee_count", method = arrayOf(RequestMethod.POST))
    fun doEmployeeCount(@RequestParam("name") name : String,
                        model : Model) : String {
        val count = employeeRepository.countByNameContainingIgnoringCase(name)
        model.apply {
            addAttribute("employee", Employee())
            addAttribute("showName", true)
            addAttribute("count", "Number of employees having name $name: $count")
            addAttribute("employees", employeeRepository.findAll().toList())
        }
        return "index"
    }
}

Even though we never wrote an implementation for EmployeeRepository, we can safely inject an instance of EmployeeRepository into our controller class. From this point, we have an HTTP GET method and two POST methods. The doEmployeeSave calls employeeRepository.save() and saves the incoming Employee object to the database. It also calls employeeRepository.findAll() and sends all employee records back to the view.

The doEmployeeCount calls our custom employeeRepository.countByNameContainingIgnoringCase method and returns a count of how many employee records contain the given name. We can pass this number back to the view. Once again, we are using employeeRepository.findAll().

This is the HTML code that works with the IndexController class.
indexhtml1indexcontroller2

Conclusion

The JPA cababilities provided by Spring Boot make developing ORM applications a breeze and it’s worth while to leverage them. For one thing, we only have to write a fraction of the code that we might have to write otherwise, but we are also less likely to introduce bugs into the application because we can trust the implementation of the JPA Repository classes and the persistence provided SQL generating capabilities.

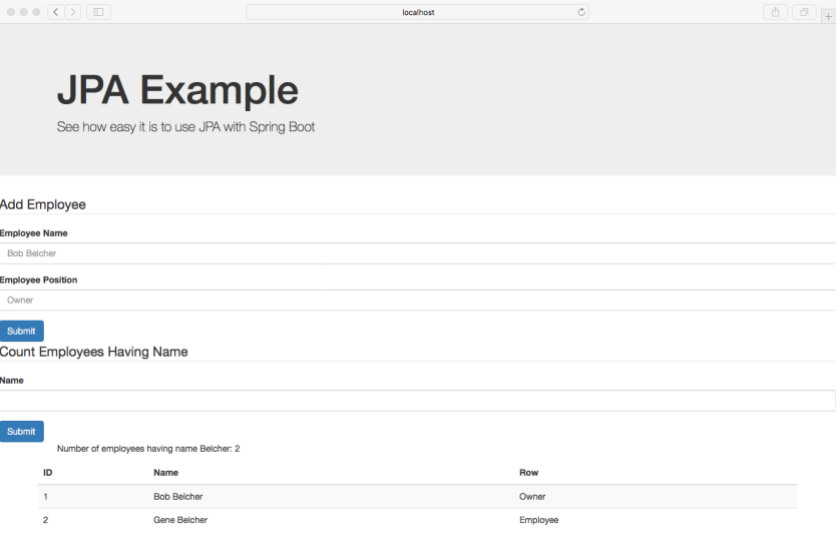
Here are some screen shots of the finished application.


You can download the code at my GitHub page here or visit the YouTube tutorial.

Kotlin Stream Image from Database

Many web applications allow users to store images for later. For example, you may want to allow users to upload a profile picture that gets displayed later on in the application. This post demonstrates how to upload an image to a web application and store the image in a database. Then we will see how to display that image in a browser.

PersistedImage

The key to storing an image in a database is to use @Lob annotation in JPA and make the datatype as a byte array. Here is an example class that stores byte array in the database.

@Entity
data class PersistedImage(@field: Id @field: GeneratedValue var id : Long = 0,
                          //The bytes field needs to be marked as @Lob for Large Object Binary
                          @field: Lob var bytes : ByteArray? = null,
                          var mime : String = ""){

    fun toStreamingURI() : String {
        //We need to encode the byte array into a base64 String for the browser
        val base64 = DatatypeConverter.printBase64Binary(bytes)

        //Now just return a data string. The Browser will know what to do with it
        return "data:$mime;base64,$base64"
    }

Kotlin has a ByteArray class. In Java you would use byte []. The effect is the same either way. When persistence provider scans this class, it will store the byte array as a Lob in the database. Nevertheless it’s not enough to simply store an image in the database. At some point in time, the user will most likely wish to see the image. That’s there the toStreamingURI() method comes in handy.

The first line uses DatatypeConverter to convert the byte array to a base64 string. Then we can append that string to “data:[mime];base64,[base 64]”. In our example, we use Kotlin’s String template feature to build such a String. We start with the data: followed by the mime (such as /img/png). Then we can add the base64 string created by DatatypeConverter. This string can get added to the src attribute of the html img tag as shown in the screen shot below.

base64string
The browser knows how to display this string as an image.

File Uploads

It’s worth while to discuss how files are upload in Spring. Spring has a MultipartFile class that can get mapped to the a file upload input tag in the form. Here is how it looks in the HTML code.
fileuploadform
There are a couple of things that are critical for this to work. First, we have to set our applications.properties file to allow large file uploads.

spring.http.multipart.max-file-size=25MB
spring.http.multipart.max-request-size=25MB

Next our form tag has to set the enctype attribute to “multipart/form-data”. Finally we have to keep track of the name attribute on our input tag so that we can map it to the server code. In our example, our input tag has it’s name attribute set to “image”.

On the server end, we use this code get an instance of MultipartFile.

@RequestMapping(method = arrayOf(RequestMethod.POST))
    fun doPost(
            //Grab the uploaded image from the form
            @RequestPart("image") multiPartFile : MultipartFile,
               model : Model) : String {
        //Save the image file
        imageService.save(multiPartFile.toPersistedImage())
        model.addAttribute("images", imageService.loadAll())
        return "index"
    }

We annotate the multipartFile parameter with @RequestPart and pass to the annotation the same name attribute that we set on our input tag. At this point, the container will inject an instance of MultipartFile that represents the file that the user uploaded to the server. The MultipartFile class has two attributes that are critical to our purposes. First it has a byte array property that represents the bytes of the uploaded file and it has the file’s MIME.

We can use Kotlin’s extension functions to add a toPersistedImage() method on MutlipartFile.

fun MultipartFile.toPersistedImage() = PersistedImage(bytes = this.bytes, mime = this.contentType)

This method simply returns an instance of PersisitedImage that can get stored in the database. At this point, we can easily store and retrieve the image from the database.

Application

The demonstration application is a regular Spring MVC application written in Kotlin. You can refer to this post on an explanation on how this works. Here is the Kotlin code followed by the HTML code.

Kotlin Code

package com.stonesoupprogramming.streamimage

import org.hibernate.SessionFactory
import org.springframework.beans.factory.annotation.Autowired
import org.springframework.boot.SpringApplication
import org.springframework.boot.autoconfigure.SpringBootApplication
import org.springframework.context.annotation.Bean
import org.springframework.context.annotation.Configuration
import org.springframework.stereotype.Controller
import org.springframework.stereotype.Repository
import org.springframework.stereotype.Service
import org.springframework.ui.Model
import org.springframework.web.bind.annotation.RequestMapping
import org.springframework.web.bind.annotation.RequestMethod
import org.springframework.web.bind.annotation.RequestPart
import org.springframework.web.multipart.MultipartFile
import javax.persistence.*
import javax.transaction.Transactional
import javax.xml.bind.DatatypeConverter

@SpringBootApplication
class StreamImageDbApplication

fun main(args: Array) {
    SpringApplication.run(StreamImageDbApplication::class.java, *args)
}

@Entity
data class PersistedImage(@field: Id @field: GeneratedValue var id : Long = 0,
                          //The bytes field needs to be marked as @Lob for Large Object Binary
                          @field: Lob var bytes : ByteArray? = null,
                          var mime : String = ""){

    fun toStreamingURI() : String {
        //We need to encode the byte array into a base64 String for the browser
        val base64 = DatatypeConverter.printBase64Binary(bytes)

        //Now just return a data string. The Browser will know what to do with it
        return "data:$mime;base64,$base64"
    }
}

//This is a Kotlin extension function that turns a MultipartFile into a PersistedImage
fun MultipartFile.toPersistedImage() = PersistedImage(bytes = this.bytes, mime = this.contentType)

@Configuration
class DataConfig {

    @Bean
    fun sessionFactory(@Autowired entityManagerFactory: EntityManagerFactory) :
             SessionFactory = entityManagerFactory.unwrap(SessionFactory::class.java)
}

@Repository
class ImageRepository(@Autowired private val sessionFactory: SessionFactory){

    fun save(persistedImage: PersistedImage) {
        sessionFactory.currentSession.saveOrUpdate(persistedImage)
    }

    fun loadAll() = sessionFactory.currentSession.createCriteria(PersistedImage::class.java).list() as List
}

@Transactional
@Service
class ImageService(@Autowired private val imageRepository: ImageRepository){

    fun save(persistedImage: PersistedImage) {
        imageRepository.save(persistedImage)
    }

    fun loadAll() = imageRepository.loadAll()
}

@Controller
@RequestMapping("/")
class IndexController(@Autowired private val imageService: ImageService){

    @RequestMapping(method = arrayOf(RequestMethod.GET))
    fun doGet(model : Model) : String {
        model.addAttribute("images", imageService.loadAll())
        return "index"
    }

    @RequestMapping(method = arrayOf(RequestMethod.POST))
    fun doPost(
            //Grab the uploaded image from the form
            @RequestPart("image") multiPartFile : MultipartFile,
               model : Model) : String {
        //Save the image file
        imageService.save(multiPartFile.toPersistedImage())
        model.addAttribute("images", imageService.loadAll())
        return "index"
    }
}

application.properties

spring.jpa.hibernate.ddl-auto=create-drop
spring.jpa.properties.hibernate.current_session_context_class=org.springframework.orm.hibernate5.SpringSessionContext
spring.datasource.driver-class-name=org.hsqldb.jdbcDriver

spring.http.multipart.max-file-size=25MB
spring.http.multipart.max-request-size=25MB

index.html

streamimage

Conclusion

Spring and Kotlin make it easy to embed images in a database and display those images in a browser. The main take away is to define a byte array property as a Lob on persisted image and then convert it to a base64 String when you wish to display it. Here are some screen shots of the working application.


You can get the source code for this project at my GitHub here or watch the video tutorial on YouTube.

Kotlin Spring JDBC Template

It’s typical for many applications, including web applications, to read and write to a database. JDBC operations are significantly simplified when using Spring JdbcTemplates and Kotlin’s language features. For example, it’s easy to one line read and insert operations into a database. This post goes through a sample web application that inserts a user into a database table and then prints a list of all users stored in the database.

Interacting with the Database

Our first order of business is to create a database schema. This is the SQL script that we will use to generate our database.

DROP TABLE IF EXISTS USERS;

CREATE TABLE USERS (
  id INTEGER IDENTITY,
  first_name VARCHAR(50),
  last_name VARCHAR(50),
  email VARCHAR(50),
  phone VARCHAR(50),
)

Now we will define a database that maps to the information held in our database. Kotlin’s data classes are ideal for this sort of task.

//Define a data class that maps to both our
//form and database table
data class User(var firstName: String = "",
                var lastName: String = "",
                var email: String = "",
                var phone: String = "")

There isn’t anything special about our User class. It’s only job is to carry information from the view to the database and back from the database to the view. Now that we have a database table and a transfer object, we need to configure our datasource so that Spring can connect our application to our database. We will define a configuration class that will define some Spring beans for us.

@Configuration
class Configuration {

    //First configure a data source that
    //generates an embedded db
    @Bean(name = arrayOf("dataSource"))
    fun dataSource(): DataSource {

        //This will create a new embedded database and run the schema.sql script
        return EmbeddedDatabaseBuilder()
                .setType(EmbeddedDatabaseType.HSQL)
                .addScript("schema.sql")
                .build()
    }

    //Create a JdbcTemplate Bean that connects to our database
    @Bean
    fun jdbcTemplate(@Qualifier("dataSource") dataSource: DataSource): JdbcTemplate {
        return JdbcTemplate(dataSource)
    }
}

The first bean, dataSource, returns an EmbeddedDatabaseBuilder object that does the work of creating an embedded database, setting it’s dialect, and running our schema.sql script to create the database definition. At this point, our database is fully ready when the build() method is called.

The next bean is a JdbcTemplate object. We create a bean definition for it so that we can inject instances of this object into our repository classes later on. The JdbcTemplate requires a DataSource object, which happens to point at our embedded database. Now let’s define a repository class that will actually work with our JdbcTemplate.

@Repository
class IndexRepository(@Autowired var jdbcTemplate: JdbcTemplate) {


    fun addUser(user: User) {
        //We can use SimpleJdbcInsert to insert a value into our table
        //The becomes super concise when combined with Kotlins apply and mapOf functions
        SimpleJdbcInsert(jdbcTemplate).withTableName("USERS").apply {
            setGeneratedKeyName("id")
            execute(
                    mapOf("first_name" to user.firstName,
                            "last_name" to user.lastName,
                            "email" to user.email,
                            "phone" to user.phone))
        }
    }

    //This allows us to query the Users table and return a list of users
    //This is one method call to jdbcTemplate with a lambda expression which makes the code
    //incredibly concise
    fun allUsers(): List = jdbcTemplate.query("SELECT FIRST_NAME, LAST_NAME, EMAIL, PHONE FROM USERS",
            { rs: ResultSet, _: Int ->
                User(rs.getString("first_name"), rs.getString("last_name"), rs.getString("email"), rs.getString("phone"))
            })
}

@Respository is a Spring sterotype annotation that marks our IndexRepository as a class that is intended to interact with the datasource. Spring provides two other stereotype annotations, @Controller and @Service, that are typically used to mark seperations in the application. @Controller is intended to interact with the view, while @Respository works with datasource. @Service should contain business logic. When developers follow this pattern, the application maintains loose coupling which makes it easy to maintain and test code.

Since IndexController is marked with @Repository, it makes sense to inject JdbcTemplate into this class so that it can work with the database. We have two methods in this class: addUser and allUsers. We’ll take each function on its own.

The addUser(user : User) method performs an insert into the database. We create an instance of SimpleJdbcInsert and pass our JdbcTemplate object into this class. The following call to withTable(“USERS”) specifies which table we are inserting a record into. Since our primary key is generated automatically by the database, we can use SimpleJdbcInsert.setGeneratedKeyName(“id”) to assign a primary key. Finally we use the execute() function to actually perform the insertion into the database. The execute() takes a map where the key is the name of the column in the database and the value is what we are inserting into the column.

There is some Kotlin magic that helps keep the code concise. For one, we are chaining our calls to setGeneratedKeyName() and execute() inside of the apply() function. We can also leverage Kotlin’s mapOf() function to generate a Map on the fly as opposed to creating a map object and populating it with values ahead of time.

The allUsers() function queries the database. In this case, we can call the query method from the jdbcTemplate object. The query() method requires two parameters. The first parameter is the query that is sent to the database. The second method is a an instance of RowMapper, which is a single abstract method (SAM) class. Since RowMapper has only one method, we can use a lambda expression to provide an implementation of RowMapper.

The RowMapper’s job is to transform the results of the database query into a User object. It provides with two objects that help with this job. The first is the good old JDBC ResetSet object and the other object is an Int that represents the row number. We only use the ResultSet in this example. The ResultSet interface has a getString() method that takes the name of the column and outputs the value stored in that column. Using getString(), we can populate each field of a User object and return it. RowMapper will handle the details of building a list and returning the List to the caller.

Web Portion

The remaining part of the application is a Spring MVC application. We aren’t going to spend a lot of time on this portion but are including it for After the @Repository tier (covered above), we have a service class that handles the business logic between the @Controller and the @Repository. In our case, it’s really boring because all our @Service class is doing is acting as a wrapper for our @Repository class, but in the real world, there is generally more application code located in this class.

@Service
class IndexService(
    //Inject IndexRepository here
    @Autowired var indexRepository: IndexRepository) {

    fun addUser(user: User) {
        indexRepository.addUser(user)
    }

    fun allUsers(): List {
        return indexRepository.allUsers()
    }
}

We also have a @Controller class that handles HTTP GET and POST requests.

@Controller
@RequestMapping("/")
class IndexController(@Autowired var indexService: IndexService) {

    @RequestMapping(method = arrayOf(RequestMethod.GET))
    fun doGet(model: Model): String {
        model.addAttribute("user", User())
        model.addAttribute("allUsers", indexService.allUsers())
        return "index"
    }

    @RequestMapping(method = arrayOf(RequestMethod.POST))
    fun doPost(model: Model, user: User): String {
        indexService.addUser(user)

        model.addAttribute("user", User())
        model.addAttribute("allUsers", indexService.allUsers())
        return "index"
    }
}

And finally the view…
View

Conclusion

Kotlin greatly enchances the already excellent JDBC abilities offered by Spring Boot. As was demonstrated in this post, developers can start with definining a data class that holds all of the data in a single row in a database table. When it comes to actually perform inserts or queries from the database, Kotlin’s mapOf(), apply, and to functions cut down on any additional verbosity that might still remain from using JDBC Template. As always, Spring makes it super simple to spring up a web application that interfaces with a database.

You can grab the source for this example from my GitHub page or view the Video tutorial on YouTube.