Kotlin provides many features that can be really useful when working with Spring. I was doing a website for my fiancee where I found an excellent use case of Kotlin’s Delegation and Extension function that I am going to share with readers today.
Code
KotlinDelegationApplication.kt
package com.stonesoupprogramming.delegation.kotlindelegation

import org.hibernate.validator.constraints.NotBlank
import org.springframework.beans.factory.annotation.Autowired
import org.springframework.boot.SpringApplication
import org.springframework.boot.autoconfigure.SpringBootApplication
import org.springframework.data.jpa.repository.JpaRepository
import org.springframework.stereotype.Controller
import org.springframework.stereotype.Service
import org.springframework.ui.Model
import org.springframework.validation.BindingResult
import org.springframework.web.bind.annotation.GetMapping
import org.springframework.web.bind.annotation.ModelAttribute
import org.springframework.web.bind.annotation.PostMapping
import org.springframework.web.bind.annotation.RequestMapping
import javax.persistence.Entity
import javax.persistence.GeneratedValue
import javax.persistence.Id
import javax.transaction.Transactional
import javax.validation.Valid
import javax.validation.constraints.NotNull

@SpringBootApplication
class KotlinDelegationApplication

enum class FamilyMemberType {Father, Mother, Daughter, Son}

//Basic entity class
@Entity
data class Belchers(
        @field: Id
        @field: GeneratedValue
        var id : Long? = null,

        @field: NotBlank(message = "Need a name!")
        var name : String = "",

        @field: NotNull(message = "Assign to a family type")
        var familyMemberType: FamilyMemberType? = null
)

//Now we are going to define a JpaRepository to handle persistence
interface BelchersRepository : JpaRepository

//Here is a service class that contains our business logic
@Service
@Transactional
class BelchersService(
        //Inject an instance of BelchersRepository
        @field : Autowired
        val belchersRepository: BelchersRepository) : BelchersRepository by belchersRepository {
    /**
     * The above line demonstrates Kotlin's delegation syntax. It works by specifying a variable whose type
     * is an interface (no concrete or abstract classes). After the colon, we specify the name of the interface
     * and the variable that provides the object we are using for delegation. The Kotlin compiler builds out all of
     * methods included in the interface and routes calls to those method to the delegate object.
     *
     * In this example, BelcherService gets all of the methods included in BelchersRepository and the belcherRepository
     * object handles the implementation of all BelcherRepository method unless we override them.
     */

    /**
     * Here is an example of where we override only one method of BelchersRepository
     *  so that we can customize the behavior.
     */
    override fun <s> save(entity: S): S {
        val formattedName = entity?.name?.split(" ")?.map { it.toLowerCase().capitalize() }?.joinToString(" ")
        if(formattedName != null){
            entity.name = formattedName
        }
        return belchersRepository.save(entity)
    }
}

//Example MVC controller
@Controller
@RequestMapping("/")
class IndexController (
        @field: Autowired
        val belchersService: BelchersService) {

    @ModelAttribute("belcherFamily")
    fun fetchFamily() = belchersService.findAll()

    @ModelAttribute("belcher")
    fun fetchBelcher() = Belchers()

    @GetMapping
    fun doGet() = "index"

    @PostMapping
    fun doPost(@Valid belcher : Belchers, bindingResult: BindingResult, model: Model) : String {
        var entity = belcher

        if(!bindingResult.hasErrors()){
            belchersService.save(belcher)
            entity = Belchers()
        }

        //Notice the use of extension functions to keep the code concise
        model.addBelcher(entity)
        model.addBelcherFamily()

        return "index"
    }

    //Some private extension functions which tend to be really useful in Spring MVC
    private fun Model.addBelcherFamily(){
        addAttribute("belcherFamily", belchersService.findAll())
    }

    private fun Model.addBelcher(belcher: Belchers = Belchers()){
        addAttribute("belcher", belcher)
    }
}

fun main(args: Array) {
    SpringApplication.run(KotlinDelegationApplication::class.java, *args)
}
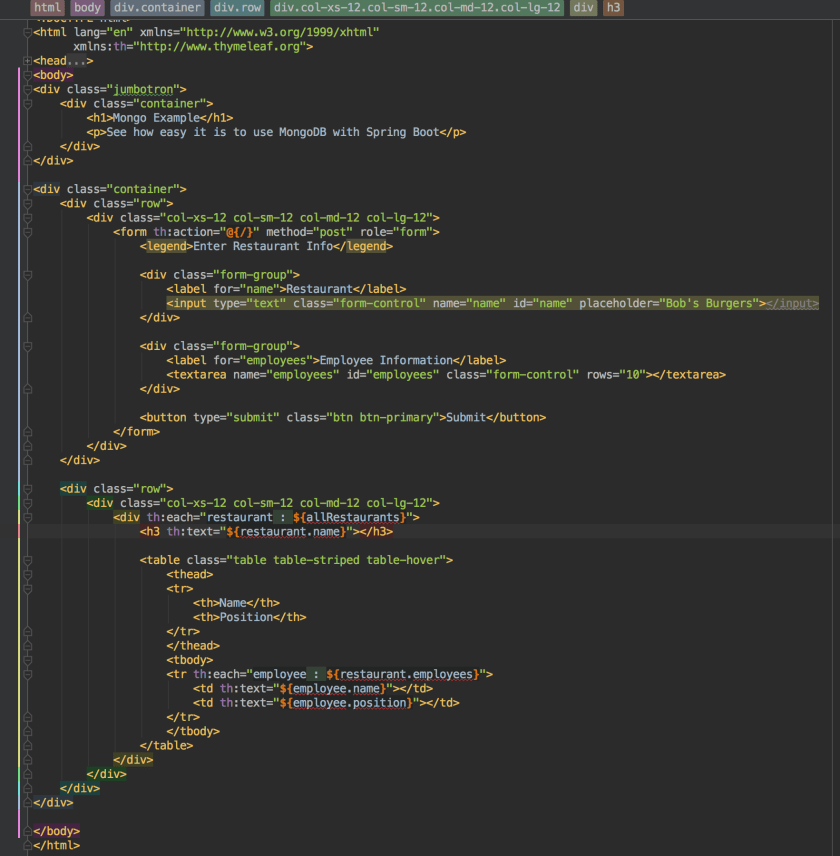
index.html
<!DOCTYPE html>
<html lang="en" xmlns="http://www.w3.org/1999/xhtml"
      xmlns:th="http://www.thymeleaf.org">
<head>
    <meta charset="UTF-8">
    <title>Kotlin Delegation Example</title>

    <script src="http://code.jquery.com/jquery-3.2.1.js"
            integrity="sha256-DZAnKJ/6XZ9si04Hgrsxu/8s717jcIzLy3oi35EouyE="
            crossorigin="anonymous"></script>

    <!-- Latest compiled and minified CSS & JS -->
    <link rel="stylesheet" media="screen" href="https://maxcdn.bootstrapcdn.com/bootstrap/3.3.7/css/bootstrap.min.css">
    <script src="https://maxcdn.bootstrapcdn.com/bootstrap/3.3.7/js/bootstrap.min.js"></script>

    <style>
        button {
            margin-top: 10px;
        }
    </style>
</head>
<body>
<div class="jumbotron">
    <div class="container">
        <h1>Kotlin Delegation</h1>
        <p>Web demonstration showing how Kotlin's delegation features pairs with Spring Data</p>
    </div>
</div>

<div class="container">
    <div class="row" th:if="${belcherFamily.size() > 0}">
        <div class="col-xs-12 col-sm-12 col-md-12 col-lg-12">
            <table class="table table-striped table-hover">
                <thead>
                <tr>
                    <th>ID</th>
                    <th>Name</th>
                    <th>Family Member Type</th>
                </tr>
                </thead>
                <tbody>
                <tr th:each="belcher : ${belcherFamily}">
                    <td th:text="${belcher.id}"></td>
                    <td th:text="${belcher.name}"></td>
                    <td th:text="${belcher.familyMemberType}"></td>
                </tr>
                </tbody>
            </table>
        </div>
    </div>

    <div class="row">
        <div class="col-xs-12 col-sm-12 col-md-12 col-lg-12">
            <form th:action="@{/}" method="post" th:object="${belcher}">
                <legend>Add a Family Member</legend>

                <div th:class="${#fields.hasErrors('name') ? 'form-group has-error' : 'form-group'}">
                    <label for="name">Name</label>
                    <input class="form-control" name="name" id="name" th:field="*{name}" />
                    <span th:if="${#fields.hasErrors('name')}" th:errors="*{name}" class="help-block"></span>
                </div>

                <select name="type" id="type" class="form-control" th:field="*{familyMemberType}">
                    <option th:each="value : ${T(com.stonesoupprogramming.delegation.kotlindelegation.FamilyMemberType).values()}"
                            th:value="${value}" th:text="${value}" />
                </select>

                <button class="btn btn-primary">Submit</button>
            </form>
        </div>
    </div>
</div>
</body>
</html>
pom.xml
<?xml version="1.0" encoding="UTF-8"?>
<project xmlns="http://maven.apache.org/POM/4.0.0" xmlns:xsi="http://www.w3.org/2001/XMLSchema-instance" 	xsi:schemaLocation="http://maven.apache.org/POM/4.0.0 http://maven.apache.org/xsd/maven-4.0.0.xsd">
	<modelVersion>4.0.0</modelVersion>

	<groupId>com.stonesoupprogramming.delegation</groupId>
	<artifactId>kotlin-delegation</artifactId>
	<version>0.0.1-SNAPSHOT</version>
	<packaging>jar</packaging>

	<name>kotlin-delegation</name>
	<description>Demo project for Spring Boot</description>

	<parent>
		<groupId>org.springframework.boot</groupId>
		<artifactId>spring-boot-starter-parent</artifactId>
		<version>1.5.6.RELEASE</version>
		<relativePath/> <!-- lookup parent from repository -->
	</parent>

	<properties>
		<kotlin.compiler.incremental>true</kotlin.compiler.incremental>
		<project.build.sourceEncoding>UTF-8</project.build.sourceEncoding>
		<project.reporting.outputEncoding>UTF-8</project.reporting.outputEncoding>
		<java.version>1.8</java.version>
		<kotlin.version>1.1.3-2</kotlin.version>
		<thymeleaf.version>3.0.2.RELEASE</thymeleaf.version>
		<thymeleaf-layout-dialect.version>2.1.1</thymeleaf-layout-dialect.version>
	</properties>

	<dependencies>
		<dependency>
			<groupId>org.springframework.boot</groupId>
			<artifactId>spring-boot-starter-data-jpa</artifactId>
		</dependency>
		<dependency>
			<groupId>org.springframework.boot</groupId>
			<artifactId>spring-boot-starter-thymeleaf</artifactId>
		</dependency>
		<dependency>
			<groupId>org.springframework.boot</groupId>
			<artifactId>spring-boot-starter-web</artifactId>
		</dependency>
		<dependency>
			<groupId>org.springframework.boot</groupId>
			<artifactId>spring-boot-devtools</artifactId>
			<scope>runtime</scope>
		</dependency>
		<dependency>
			<groupId>org.hsqldb</groupId>
			<artifactId>hsqldb</artifactId>
			<scope>runtime</scope>
		</dependency>
		<dependency>
			<groupId>org.jetbrains.kotlin</groupId>
			<artifactId>kotlin-stdlib-jre8</artifactId>
			<version>${kotlin.version}</version>
		</dependency>
		<dependency>
			<groupId>org.jetbrains.kotlin</groupId>
			<artifactId>kotlin-reflect</artifactId>
			<version>${kotlin.version}</version>
		</dependency>

		<dependency>
			<groupId>org.springframework.boot</groupId>
			<artifactId>spring-boot-starter-test</artifactId>
			<scope>test</scope>
		</dependency>
	</dependencies>

	<build>
		<sourceDirectory>${project.basedir}/src/main/kotlin</sourceDirectory>
		<testSourceDirectory>${project.basedir}/src/test/kotlin</testSourceDirectory>
		<plugins>
			<plugin>
				<groupId>org.springframework.boot</groupId>
				<artifactId>spring-boot-maven-plugin</artifactId>
			</plugin>
			<plugin>
				<artifactId>kotlin-maven-plugin</artifactId>
				<groupId>org.jetbrains.kotlin</groupId>
				<version>${kotlin.version}</version>
				<configuration>
					<compilerPlugins>
						<plugin>spring</plugin>
					</compilerPlugins>
					<jvmTarget>1.8</jvmTarget>
				</configuration>
				<executions>
					<execution>
						<id>compile</id>
						<phase>compile</phase>
						<goals>
							<goal>compile</goal>
						</goals>
					</execution>
					<execution>
						<id>test-compile</id>
						<phase>test-compile</phase>
						<goals>
							<goal>test-compile</goal>
						</goals>
					</execution>
				</executions>
				<dependencies>
					<dependency>
						<groupId>org.jetbrains.kotlin</groupId>
						<artifactId>kotlin-maven-allopen</artifactId>
						<version>${kotlin.version}</version>
					</dependency>
				</dependencies>
			</plugin>
		</plugins>
	</build>

</project>
application.properties
spring.thymeleaf.mode= HTML
spring.thymeleaf.cache=false
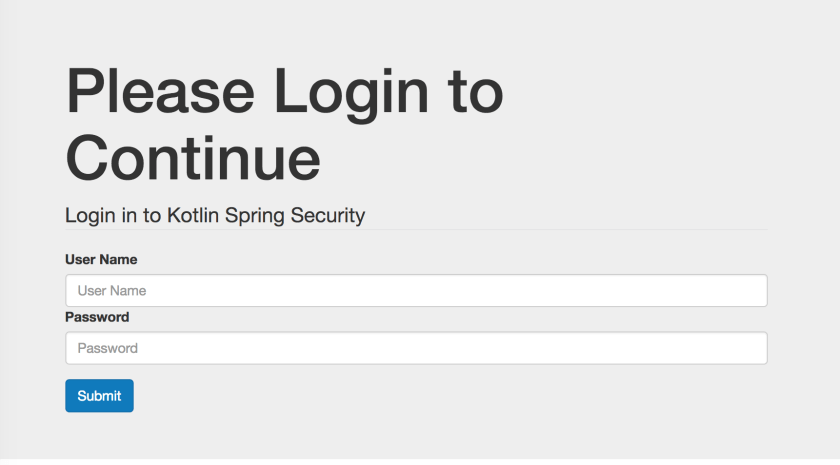
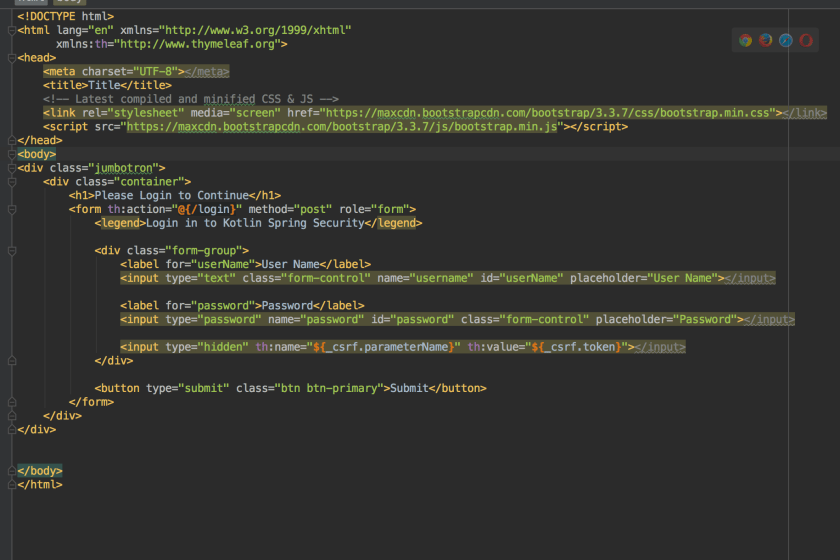
Project Structure

Explanation
Most developers are familiar with the delegation pattern. Delegation provides many of the same benefits as inheritence, but helps reduce issues such as fragile base classes or tight coupling to the base class. Kotlin’s delegation features go further by requiring developers to use an interface which helps promote loose coupling and programming to an interface. Since delegate objects aren’t part of an inheritance chain, we are free to use mutliple objects with delegation.
One of the huge drawbacks of using the delegation pattern in Java is the amount of work involved to use the pattern. Java requires developers to actually declare and implement each method of the delegate object. Although most IDE’s are happy to generate delegate methods, such methods require maintaince later on should an interface add or remove methods. This makes inheritence more attractive since the Java compiler adds or removes methods in child classes as they are added or removed in the base class without additional work from the developer.
The Kotlin compiler address the problems associated with developing delegate objects by generating the delegate methods for the developer. The Kotlin delegation syntax is found in KotlinDelegationApplication.kt on lines 48-51. As mentioned above, Kotlin requires the usage of interfaces when using delegation. This works nicely with Spring Data’s JPA template, since developers simply declare an interface that extends JpaRepository anyway. The delegation pattern is used in the BelchersService class, which takes an instance of BelchersRepository in its constructor and then uses the object to build out delegate methods.
At this point, BelcherService has the same methods as BelcherRepository without the need to generate boilerplate declarations and implementations to the delegate object. Since the code is loosely coupled, we are free to swap out different implementations of BelcherRepository as required. The code is easier to read because we are spared the boilerplate code required to implement the delegation pattern.
You may view the source at https://github.com/archer920/KotlinDelegation