Spring Security provides a custom login page that is functional but not very attractive. In most cases, web developers want a more attractive looking login page. This post demonstrates how to configure Spring Security to use a custom login page. Readers can view this tutorial for a demonstration on how to configure basic Spring Security.
Front End—Write a Custom Page
We are going to start by writing a custom login page. Spring Security is very flexible about the page itself, but there are a few rules that need to be followed.
- Form requires Username
- Form requires Password
- CSRF Token is required
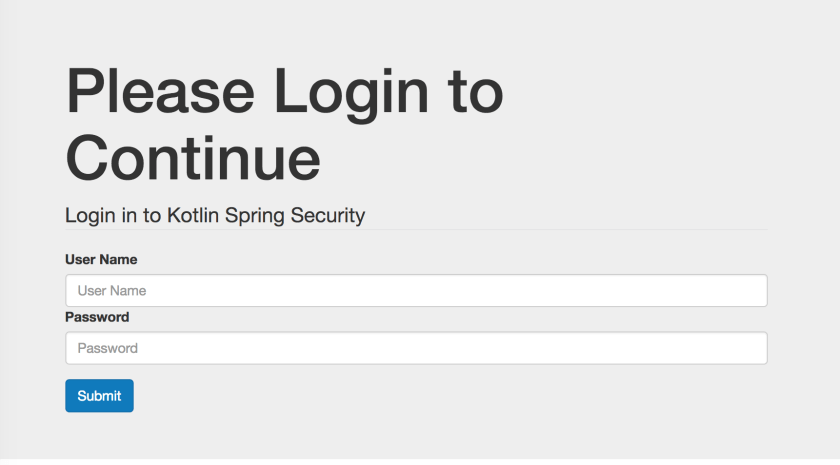
This is a screen shot of the page that will be used for this tutorial.
Followed by the code.
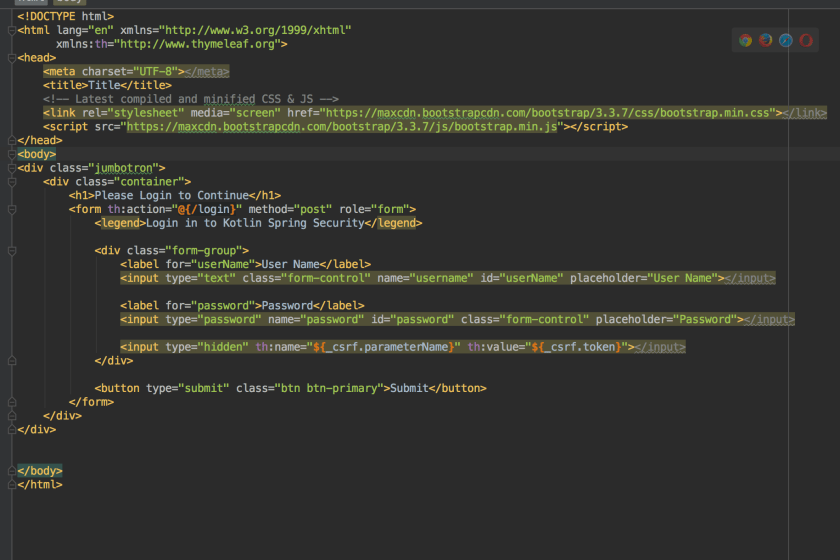
It’s critical to remember to include the CSRF token in the form. Without it, the server will refuse any HTTP POST requests and will respond with code 405. The th:name="${_csrf.parameterName}" th:value="${_csrf.token}" on an input take will do the job of adding the CSRF token.
Backend—Configure Spring
Once the front end code is ready, you need to configure Spring Security to use this page. In order to render the login page, Spring will need some sort of controller class. Developers are free to write their own, but it’s also trivial to make use of the one Spring is happy to provide.
@Configuration
class WebConfig : WebMvcConfigurerAdapter() {
    override fun addViewControllers(registry: ViewControllerRegistry) {
        //This class adds a default controller for the login page.
        //Otherwise you would need to write a custom controller class
        registry.addViewController("/login").setViewName("login")
    }
}
The next job is to configure Spring security.
@Configuration //Make this as a configuration class
@EnableWebSecurity //Turn on Web Security
class SecurityWebInitializer : WebSecurityConfigurerAdapter(){
    override fun configure(http: HttpSecurity) {
        http
                .authorizeRequests()
                    //We need to allow anonymous users to
                    //access the login page (otherwise we get 403)
                    .antMatchers("/login").anonymous()
                    .anyRequest().authenticated()
                .and()
                    //Setup a custom login page
                    .formLogin()
                        .loginPage("/login")
                        .usernameParameter("username")
                        .passwordParameter("password")
                .and()
                    .httpBasic()
    }

    override fun configure(auth: AuthenticationManagerBuilder) {
        //This code sets up a user store in memory. This is
        //useful for debugging and development
        auth
                .inMemoryAuthentication()
                    .withUser("bob")
                    .password("belcher")
                    .roles("USER")
                .and()
                    .withUser("admin")
                    .password("admin")
                    .roles("USER", "ADMIN")
    }
}
It’s important to allow anonymous() access to the login page. Without it, Spring Security will continue to redirect to the login page until the server returns 403 (too many redirects).
Conclusion
Once complete, the site will render a custom login page like what is shown in the video.
You can get the code for the complete project at my GitHub page.
