Twitter provides REST APIS that make it incredibly easy to access information from Twitter. When combined with Node.js, it becomes a trivial task to create a web application that connects to Twitter and displays the latest tweets for a User.
In order to begin, you will need to register at Twitter’s developers page. The details page will give you several tokens that you will need to connect to Twitter: consumer_key, consumer_secret, access_token_key, and access_token_secret. Keep this information handy as you will need it for later.
Now we can create the project. I use Intellij’s node.js plugin to create my project, but you will want to create a project structure that is similar to the one shown in the following screenshot. You can view a tutorial one how to do this at this link or use your IDE or you may find the directions at Express.js to be useful as well.

Once you have created your project (making sure you have express.js and handlebars.js), you will need to add Twitter. Open up the terminal and navigate to your project’s directory. Then type
npm install twitter
At this point you are ready to begin developing.
Create a keys.js file in your routes folder. Then populate it with the following code. You will use the consumer_key, consumer_secret, access_token_key, and access_token_secret properties that you obtained earlier on Twitter’s developer’s page and replace the values in this file accordinly.
exports.twitterKeys = {
    consumer_key: '[your consumer key here]',
    consumer_secret: '[your consumer secret here]',
    access_token_key: '[your access_token_key here]',
    access_token_secret: '[your acess_token_secret here]',
};
The next job is to write the index.js file that handles HTTP GET and POST requests. (You can view this tutorial for more information). The code is very short as we are only handling a GET and POST request.
//Pull in our libraries
var express = require('express');
var router = express.Router();
var Twitter = require('twitter');

//Get our access keys
var keys = require('./keys.js');

//Create twitter client
var twitter = new Twitter(keys.twitterKeys);

//Store our tweets
var tweets = [];

/* GET home page. */
router.get('/', function (req, res) {
    res.render('index', {title: 'Node Twitter', tweets: tweets});
});

router.post('/', function (req, res) {
    //Get the user name and number of tweets from the form
    var user = req.body.user_name;
    var numTweets = req.body.tweets;

    //Clear out old tweets
    tweets = [];

    //Hit Twitter for the information
    twitter.get('statuses/user_timeline', {screen_name: user, count: numTweets})
        .then(function (tw) {
            //Loop through the results
            for (var i = 0; i < tw.length; i++) {
                tweets.push({timestamp: tw[i]['created_at'], tweet: tw[i]['text']});
            }
            //Render the index page with the tweets
            res.render('index', {title: 'Node Twitter', tweets: tweets});
        })
        .catch(function (error) {
            console.log(error);
            throw error;
        });
});

module.exports = router;
The magic of retrieving tweets is done with the twitter.get(). This function takes a rest endpoint (see here for a list) along with a map of arguments that end up becoming URL parameters in the request. Since we are getting the user’s tweets, we are going to hit the statuses/user_timeline endpoint. The screen_name argument is the users Twitter name and count is the number of tweets that are getting returned.
The Twitter api returns a massive JSON response that holds just about every detail we could ever want to know about a Tweet. We are only interested in when the tweet was created and the text of the tweet. So we loop through the tw (the response object) and just grab those two properties and push them into our tweets array. When we have finished, we will pass tweets back to the view and render the index page.
Our final job is to define our html templates. Since we are using Bootstrap and jQuery, we will need to add these libraries to layout.hbs.
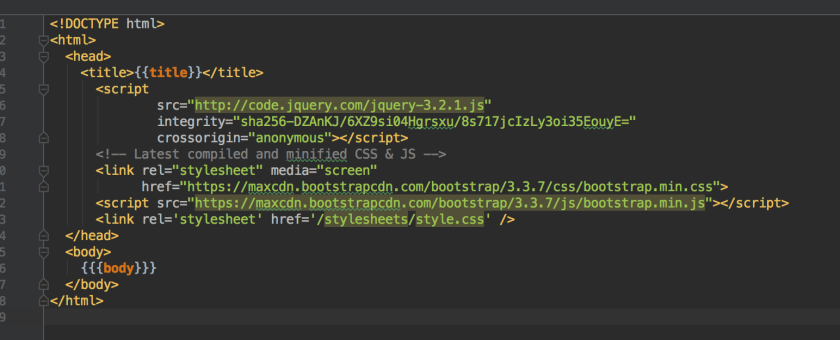
Next we need to write our index.hbs template. Here is the source.
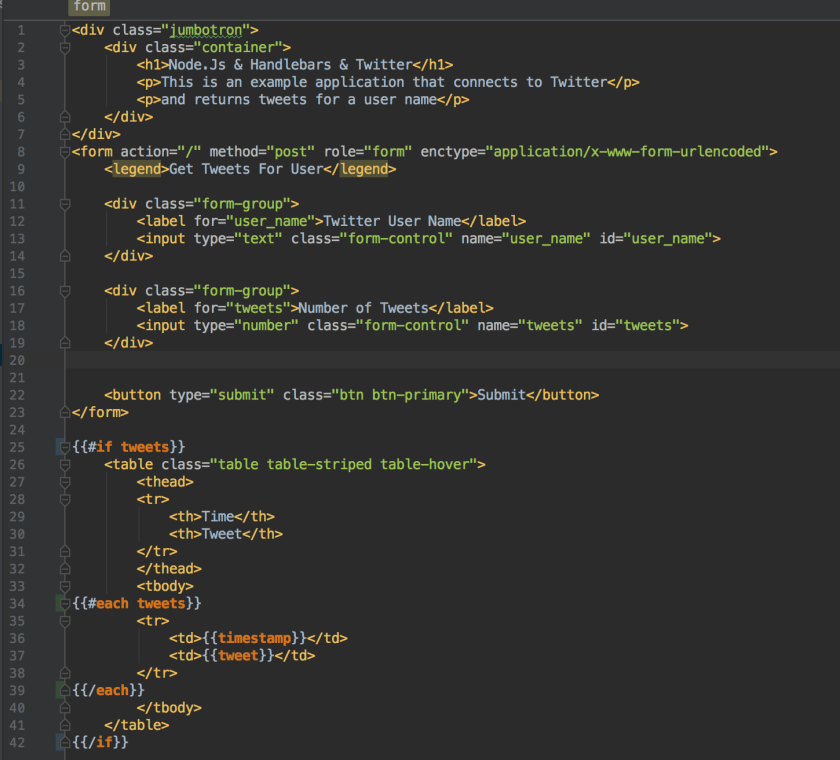
Line 25 starts with {{#if tweets}}. This is a conditional rendering tag that only renders the code between 25-42 if there are tweets to display. Without it, we would write out the table between lines 26-41 when there are no tweets, which would not make a lot of sense.
Once we have tweets, the #if condition will be true and the page will write out a table of tweets. The code on line 34-39 will write out a table row for each tweet that is contained. When we are finished, we will get this output.


You can get the code out my GitHub page here or view the video tutorial on my YouTube channel.

Great article on the HTTP module in Node.js! It’s always useful to learn the fundamentals of different technologies. For those interested in enhancing their skills, the Best Laravel Training Course in Surat is an excellent choice to consider.
LikeLike