Create Node.jS & Handlebars & Express.js Project from command line

It’s trivial to create an empty Node.js project using express generator using the command line. You can follow the guide found at this link for the official express generator example or just keep reading.

Begin by opening up your terminal and navigate to any folder on your file system. Keep in mind that the project will be created as a sub-directory of the folder you choose. If you haven’t installed express generator then execute the following command.

npm install express-generator -g

This command will install express generator on your system. Once the installation is complete, you can create an express project with the handlebars view engine using this command.

express --hbs [application name]

Replace [application name] with the name of your application. For example express -hbs myhbsproject. The script will create a folder in the current directory that has the same name as your application. You should see terminal output that looks similar to the screen shot.
create_the_project
If you look closely, the script tells you the next two steps. First you need to install the dependencies.

cd [application name]
npm install

Once again, npm will do the job of downloading all required project dependencies.
install_packages
Finally, you can run the project by issuing the next command in the terminal.

DEBUG=[application name]:* npm start

You will see this output in the terminal.
run_server
When the server is running, you can open up your web browser and point it at http://localhost:3000/ to see the default homepage.
homepage

Folder Structure

For those people who are curious, you will get the following folder structure when using express generator to create a project.
structure
The public folder is for files such as client side javascript, css, and images that can be referenced by a web page. You should put your server js in the routes folder. All handlebar template files should get placed in the views folder.

You can view the YouTube video here.

Advertisement

Node.js & Spotify

Spotify provides APIs that allow developers to write client applications. This tutorial will demonstrate how to use Node.js to create a simple web application that queries Spotify for information about a particular song. Start by creating a Node.js application with a folder structure that resembles the one shown in this screenshot. You can view a tutorial one how to do this at this link or use your IDE.
Folder_Structure You will want to have the following dependencies in your package.json file.

{
  "name": "spotifynode",
  "version": "0.0.0",
  "private": true,
  "scripts": {
    "start": "node ./bin/www"
  },
  "dependencies": {
    "body-parser": "~1.17.1",
    "cookie-parser": "~1.4.3",
    "debug": "~2.6.3",
    "express": "~4.15.2",
    "hbs": "~4.0.1",
    "morgan": "~1.8.1",
    "node-spotify-api": "^1.0.5",
    "serve-favicon": "~2.4.2"
  }
}

Spotify requires developers to create application keys in order to use their APIs. Follow the guide provided here in order to create a developer account with Spotify. Once you have created an application, you will need to retain the application id and secret.

Start by creating a keys.js file in the routes folder. It should look like the following example.

keys.js

exports.spotifyKeys = {
    id: 'Spotify Id Here',
    secret: 'Spotify Secret Here'
};

The next thing to do is to write the server side code that handles HTTP GET and POST requests. Here is the code for index.js.

index.js

var express = require('express');
var router = express.Router();

//Import the Spotify API
var Spotify = require('node-spotify-api');

//Import our Keys File
var keys = require('./keys');

//Create a Spotify Client
var spotify = new Spotify(keys.spotifyKeys);

//Store the results of a request to spotify
var results = [];

/* GET home page. */
router.get('/', function (req, res) {
    res.render('index', {title: 'Spotify', results: results});
});

router.post('/', function (req, res) {
    //Get the type of Query from the User
    var type = req.body.param_type;

    //Get the query from the user
    var query = req.body.param_query;

    //Clear out old results
    results = [];

    //Make a request to Spotify
    spotify.search({type: type, query: query})
        .then(function (spotRes) {

            //Store the artist, song, preview link, and album in the results array
            spotRes.tracks.items.forEach(function(ea){
                results.push({artist: ea.artists[0].name,
                              song: ea.name,
                              preview: ea.external_urls.spotify,
                              album: ea.album.name});
            });
            //Render the homepage and return results to the view
            res.render('index', {title: 'Spotify', results: results});
        })
        .catch(function (err) {
            console.log(err);
            throw err;
        });
});

module.exports = router;

This code sets up two handlers for GET and POST requests. More details about how to do this can be found in this post. We begin on line 5 by importing the Spotify API into our script. Then we pull in the keys.js file we created earlier so that we can authenticate with Spotify. The next line creates a spotify object and we pass our creditionals to its constructor.

The next point of interest is the spotify.search found on line 32. The spotify.search function takes in two arguments, type and query. The type argument specifies the type of query and the query is the actual search criteria that we are going to send to the API. The spotify library will make correct rest calls to the Spotify API and it will return a response.

Inside of the body of the promise function, we push some information about the song to the results array so that we can display it to the view. In this case, we are going to grab the artist, song, a preview url, and the song’s album. We then return it to the view for display in a table.

index.hbs

We can use Handlebars to markup a template page that will get returned to the browser from the server.
spotify-index

Conclusion

When run, the application will look like the following screenshots.


You can view the source from my GitHub page at this link.

Node.js Handlebars Twitter

Twitter provides REST APIS that make it incredibly easy to access information from Twitter. When combined with Node.js, it becomes a trivial task to create a web application that connects to Twitter and displays the latest tweets for a User.

In order to begin, you will need to register at Twitter’s developers page. The details page will give you several tokens that you will need to connect to Twitter: consumer_key, consumer_secret, access_token_key, and access_token_secret. Keep this information handy as you will need it for later.

Now we can create the project. I use Intellij’s node.js plugin to create my project, but you will want to create a project structure that is similar to the one shown in the following screenshot. You can view a tutorial one how to do this at this link or use your IDE or you may find the directions at Express.js to be useful as well.
project_structure
Once you have created your project (making sure you have express.js and handlebars.js), you will need to add Twitter. Open up the terminal and navigate to your project’s directory. Then type

npm install twitter

At this point you are ready to begin developing.

Create a keys.js file in your routes folder. Then populate it with the following code. You will use the consumer_key, consumer_secret, access_token_key, and access_token_secret properties that you obtained earlier on Twitter’s developer’s page and replace the values in this file accordinly.

exports.twitterKeys = {
    consumer_key: '[your consumer key here]',
    consumer_secret: '[your consumer secret here]',
    access_token_key: '[your access_token_key here]',
    access_token_secret: '[your acess_token_secret here]',
};

The next job is to write the index.js file that handles HTTP GET and POST requests. (You can view this tutorial for more information). The code is very short as we are only handling a GET and POST request.

//Pull in our libraries
var express = require('express');
var router = express.Router();
var Twitter = require('twitter');

//Get our access keys
var keys = require('./keys.js');

//Create twitter client
var twitter = new Twitter(keys.twitterKeys);

//Store our tweets
var tweets = [];

/* GET home page. */
router.get('/', function (req, res) {
    res.render('index', {title: 'Node Twitter', tweets: tweets});
});

router.post('/', function (req, res) {
    //Get the user name and number of tweets from the form
    var user = req.body.user_name;
    var numTweets = req.body.tweets;

    //Clear out old tweets
    tweets = [];

    //Hit Twitter for the information
    twitter.get('statuses/user_timeline', {screen_name: user, count: numTweets})
        .then(function (tw) {
            //Loop through the results
            for (var i = 0; i < tw.length; i++) {
                tweets.push({timestamp: tw[i]['created_at'], tweet: tw[i]['text']});
            }
            //Render the index page with the tweets
            res.render('index', {title: 'Node Twitter', tweets: tweets});
        })
        .catch(function (error) {
            console.log(error);
            throw error;
        });
});

module.exports = router;

The magic of retrieving tweets is done with the twitter.get(). This function takes a rest endpoint (see here for a list) along with a map of arguments that end up becoming URL parameters in the request. Since we are getting the user’s tweets, we are going to hit the statuses/user_timeline endpoint. The screen_name argument is the users Twitter name and count is the number of tweets that are getting returned.

The Twitter api returns a massive JSON response that holds just about every detail we could ever want to know about a Tweet. We are only interested in when the tweet was created and the text of the tweet. So we loop through the tw (the response object) and just grab those two properties and push them into our tweets array. When we have finished, we will pass tweets back to the view and render the index page.

Our final job is to define our html templates. Since we are using Bootstrap and jQuery, we will need to add these libraries to layout.hbs.
layout.hbs
Next we need to write our index.hbs template. Here is the source.
index
Line 25 starts with {{#if tweets}}. This is a conditional rendering tag that only renders the code between 25-42 if there are tweets to display. Without it, we would write out the table between lines 26-41 when there are no tweets, which would not make a lot of sense.

Once we have tweets, the #if condition will be true and the page will write out a table of tweets. The code on line 34-39 will write out a table row for each tweet that is contained. When we are finished, we will get this output.

You can get the code out my GitHub page here or view the video tutorial on my YouTube channel.

Use Handlebars and Express in Node.js

Node.js is an excellent server side platform that makes it really easy to write and deploy sites. In this post, I will demonstrate how to use Node.js in combination of Express and Handlebars to create an example registration form. You can view a tutorial one how to create a project at this link or use your IDE.

Views

We need to define a couple of web pages for the view. The first page is a master template that is used when serving every page in the site.
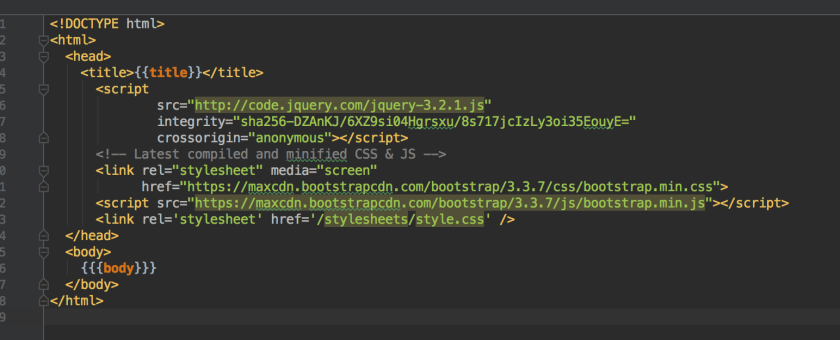
layout.hbs

Layout_hbs

There are a couple of interesting aspects about the layout.hbs code fragment. For one thing, it provides us with a common place to define our site level css and javascript. In this example, both jQuery and Bootstrap are added in this file and are therefore included in every other page.

The other aspect is the {{{body}}}. The layout.hbs code does not have its own body. Instead, it use a placeholder {{{body}}} that represents what will utlimately become the body of each html page. Our next two pages only define the body portion of the page and they are inserted into the html page at the {{{body}}}.
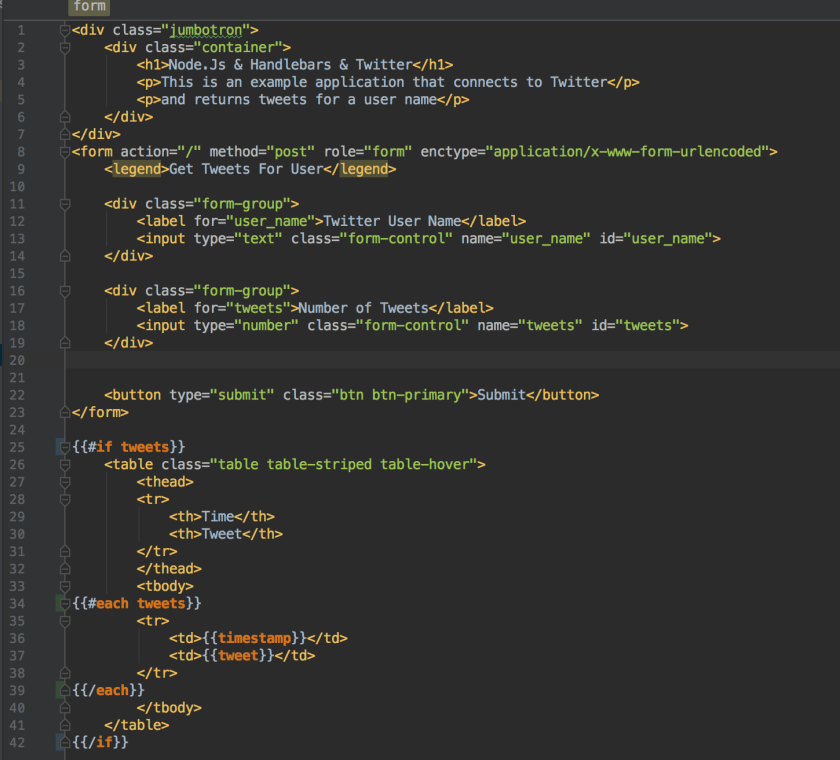
index.hbs

The index.hbs is one of two files that are inserted at the {{{body}}} portion of the labyout.hbs file. This file provides the user with an example registration form.

index_hbs

In all truthfulness, there isn’t anything special about this page whatsoever. This page is literally a regular html form with some bootstrap css to make it look presentable. The magic happens on the backend with the index.js file.

index.js

This file contains the code that handles both HTTP GET and HTTP Post requests.

var express = require('express');
var router = express.Router();

/* GET home page. */
router.get('/', function(req, res, next) {
res.render('index', { title: 'Node Tutorial' });
});

router.post('/', function(req, res){
//Grab the request body
var body = req.body;

var res_body = {
first_name: body.first_name,
last_name: body.last_name,
email: body.email
};

res.render('welcome', res_body);
});

module.exports = router;

This script work by creating two variables. First an express variable followed by a router variable. The router is the object that does the work of handling HTTP requests. The first function is a router.get(‘/’, function(…){…}). That function handles all HTTP GET requests to our index page which is mapped to the root of the site “/”. The call back function takes three parameters: req, res, and next. Next is unused in this example but req stands for Request and contains the request body the browser sent back to the server. The res stands for Response and represents the response the server sends back to the browser.

The function for our GET request has only one line of code. res.render('index', {title: 'Node Tutorial' }). Although it doesn’t seem like much, that single line of code packs a massive punch. For one thing, it is tell the server to combine the layout.hbs and index.hbs into one html document by inserting index.hbs at the {{{body}}} placeholder in layout. It’s also telling the template engine to insert the phrase ‘Node Tutorial’ at the {{title}} placeholder found in layout.hbs. When these operations are complete, the browser gets an html file that resembles the screen shot below.

homepage

The next function is the router.post('/', function(...){...}). This function handles http post requests for the homepage. On the first line of this function, we store the request body inside of a body variable. Each property on the body, first_name, last_name, email, pw, pw_confirm all represent our text boxes in index.hbm as specified by the name attribute on each of those input fields. So when the user enters ‘Bob’ in the box labeled as First Name on our form, the body.first_name gets set to the String ‘Bob’. This is true for each field on the form.

All we are doing in this particular example is gathering the first_name, last_name, and email fields from the request body and storing them in an object res_body. The last line of code res.render('welcome', res_body); tells the server to redirect to the welcome.hbm page and pass the res_body variable to the template engine. This will allow the template engine to access the values stored in res_body when it renders the the welcome page.

welcome.hbs

The final page of this project is the welcome.hbm page. This page is incredibly similar to the index.hbs page in that it gets inserted into layout.hbs at the {{{body}}} variable. Here is the code for welcome.hbm

welcome_hbs.png

This page defines three placeholders: {{first_name}}, {{last_name}}, and {{email}}. All of these place holders map to the properties in the res_body variable that we sent back to the view in index.js. When the template engine sees the res_body variable, it knows to insert res_body.first_name at {{first_name}}, res_body.last_name at {{last_name}}, and res_body.email at {{email}}. Below is a screenshot of the result.

Conclusion

Node.js make it really easy to create an MVC style site. Developers need to leverage the router variable and map html end points to various HTTP request and then respond as needed. Information can be easily sent back to the view using JavaScript objects where the values can get inserted into Handlebars templates.

You can get the code for this tutorial at my Github page.
Visit the video tutorial at https://youtu.be/rEdQ6fvSNOk

%d bloggers like this: